Articles are paginated with only three posts here for example. You can set the number of entries to show on this page with the “pagination” setting in the config file.
This is the multi-page printable view of this section. Click here to print.
Blog
- Customer Q&A: Common Questions About Orchestrator
- Hacking The Build and Deployment Process of Serverless Workflows
- Installing Orchestrator via the Red Hat Developer Hub Helm Chart
- Building and Deploying Serverless Workflows
- Creating Extracted OpenAPI Documents for Integrating Systems on Serverless Workflows
- Production Mode vs. Dev Mode
- Serverless Workflows: an Automated Developer Experience
- Serverless Workflows: an Automated Developer Experience Step-by-Step
- What is Sonataflow Operator?
Customer Q&A: Common Questions About Orchestrator
Frequently asked questions and answers from our customer interactions about Orchestrator
Customer Q&A: Common Questions About Orchestrator
This document will serve as the Orchestrator’s Q&A collection. Customer submitted questions are provided along with detailed answers.
Table of Contents
- Getting Started & Overview
- Development & Testing
- Building & Deployment
- Authentication & Security
- Integration & APIs
- UI & User Experience
- Subflows
- Architecture & Infrastructure
- Advanced Topics & Troubleshooting
Getting Started & Overview
Q: How mature is the solution Orchestrator? Is it still cutting edge technology or already used by other customers?
A: The Orchestrator was GAed in RHDH 1.5. The current version is 1.6 and it will be merged into RHDH in 1.7. At this point we will have one unified operator which supports RHDH and the Orchestrator facilities. There are other customers using the Orchestrator in production - even on a large scale with multiple thousands of users and others are onboarding to it currently.
Q: What is the difference between a simple Workflow (kn workflow create) vs. a Quarkus app workflow (kn workflow quarkus create)?
A: The main difference is in the project layout. The kn-workflow quarkus create will create a project in Quarkus layout, meaning, it will include a maven project and the workflow resources will be placed in src/main/resources At development, the developer can use Quarkus cli or maven to running the workflow, using maven/Quarkus tools, add additional dependencies to the pom file (e.g if needed for specific configuration) and have more flexibility in the development. This will use the local maven repository to download all of the resources, so the development loop is shorter.
The kn-workflow create uses the flat layout, in which there are only workflow resources and for running there will be a use of a devmode image. Therefore the workflow will be built and run inside a container
Q: What is a workflow? Is it just an app exposing a REST API?
A: In SonataFlow, a workflow is a declarative description of a sequence of steps—also called states—used to orchestrate services, functions, and logic. These workflows are defined in YAML or JSON following the Serverless Workflow Specification.
Technically, when deployed (e.g., using Quarkus in SonataFlow), the workflow is exposed as a REST endpoint. But:
- The workflow itself is not the implementation of the logic—it’s the orchestration definition of what happens, in what order, and under what conditions.
- The engine handles the workflow execution, state transitions, and interactions with external services.
Workflow can be triggered also by cloud-events, when the workflow application is subscribed to a Kafka topic or via Knative broker. At development time, there is no code to implement. Workflow definition is done using the spec and the code is generated by the SonataFlow tools at build time (or at runtime in development mode). Therefore, there isn’t a set of APIs, as this is an internal part of the SonataFlow. However, each workflow exposes set of APIs that can be viewed at development time using the devtools-ui by using the swagger-ui extension in the devtools dashboard.
Adding custom code to be called in the context of a workflow is also supported as part of the workflow definition. See more here: https://sonataflow.org/serverlessworkflow/latest/core/custom-functions-support.html
Q: What possibilities do we have to develop workflows? SonataFlow YAML and Quarkus only?
A: SonataFlow is an implementation of the serverless workflow spec: https://sonataflow.org/serverlessworkflow/main/core/cncf-serverless-workflow-specification-support.html It can be written in YAML or JSON format. Then the build process using sonataflow-builder image generates from the workflow definition (and schema/specs) a Quarkus application. The development tools for the workflow are mentioned in their getting started: https://sonataflow.org/serverlessworkflow/main/getting-started/getting-familiar-with-our-tooling.html
Another option is to use Quarkus cli or mvn quarkus:dev
For writing the workflows there is a VSCode extension that offers code completion and render of the diagram. For workflows that relies on extended Orchestrator features, such as the form-widgets, it is preferred to use the rhdh-local or local backstage with Quarkus.
Containers which include the workflow can then be built and deployed using the GitOps profile: https://sonataflow.org/serverlessworkflow/main/cloud/operator/deployment-profile.html
Q: What are these products, and what are their corresponding Red Hat product names? Apache KIE, Kogito, SonataFlow, Drools/jBPM
A: Apache KIE (Knowledge is Everything): https://kie.apache.org/
It is the Apache Software Foundation umbrella where we develop for example the serverless workflows execution engine, the operator, etc.
Includes sub-projects like SonataFlow (serverless workflows), Drools (business rules), jBPM (business automation), and many cross-project components.
All these projects are open source, and developed and maintained following the Apache Software Foundation governance recommendations and licensing.
Companies like Red Hat, IBM, and others, use these work as the building blocks for delivering their branded products.
Note: sometimes we don’t have a 1:1 correspondence between a sub-project and a GitHub repository.
Kogito: It is the core technology upon which we build cloud-native business automation, rules execution, serverless workflows, Data Index, etc. For example, the Drools sub-project holds mostly all related with business rules, the respective execution, and is mostly focused on that. While Kogito adds for example the ability for executing business rules via REST endpoints.
SonataFlow: It is the name of the sub-project dedicated to develop our vision of the Serverless Workflows Specification. Community documentation: https://sonataflow.org/serverlessworkflow/main/index.html
Pointers to the repositories:
https://github.com/apache/incubator-kie-kogito-runtimes In this repository we develop the components dedicated to the SonataFlow workflows execution, including persistence, etc.
https://github.com/apache/incubator-kie-kogito-apps In this repository we develop the SonataFlow supporting services like the DataIndex and the Jobs Service.
https://github.com/apache/incubator-kie-tools In this repository we develop the SonataFlow operator, the Kn workflows cli, the supporting services images, the builder image, etc.
Drools: Is the sub-project dedicated to business rules execution.
jBPM: Is the sub-project dedicated to business automation (BPM).
Correspondence with Red Hat products:
Red Hat OpenShift Serverless Logic (OSL): Is built on top of the SonataFlow sub-project and Kogito components. Product documentation: https://docs.redhat.com/en/documentation/red_hat_openshift_serverless/1.36/html/serverless_logic/index
Red Hat Process Automation Manager (RHPAM, currently under maintenance only): Is built on top of jBPM, Drools and other components. This product is now continued by IBM as the IBM Business Automation Manager Open Editions.
Development & Testing
Q: What is a good way to verify OpenAPI specs and workflows?
A: Usually we suggest running locally, testing it by solving the errors as they come, if any comes. There is no sandbox to test OpenAPI specs with workflow.
Q: What local test setup do you recommend?
A: For testing the interaction between workflows and RHDH there are few options:
Use rhdh-local. This setup runs RHDH locally in its container and SonataFlow on its own container that points to local development environment.
Use Orchestrator plugins development env from stable branch, e.g.: https://github.com/redhat-developer/rhdh-plugins/tree/orchestrator-1.6/workspaces/orchestrator#run-locally-from-this-repo This also runs SonataFlow locally: https://github.com/redhat-developer/rhdh-plugins/tree/orchestrator-1.6/workspaces/orchestrator#devmode-local-configuration
Q: How to find which version of a workflow a run was executed?
A: ProcessInstances information is stored in the Data-Index, therefore the information is available only there, via the GraphQL.
For getting the version for a specific instance, GraphQL supports filters, e.g.
curl -s -X POST 'http://data-index-sonataflow-infra.apps.example.lab.eng.tlv2.redhat.com/graphql/' \
 -H 'Content-Type: application/json' \
  -d '{
    "query": "query { ProcessInstances(where: { id: { equal: \"xxxxxxx-xxxx-xxxx-xxxx-xxxxxxxxxxxx\" } }) { id processId state version } }"
  }' | jq
{
  "data": {
    "ProcessInstances": [
      {
        "id": "xxxxxxx-xxxx-xxxx-xxxx-xxxxxxxxxxxx",
        "processId": "dynamic-course-select",
        "state": "COMPLETED",
        "version": "1.0"
      }
    ]
  }
}
Q: What do you recommend for testing workflows? If we have longer workflows, how can we test individual parts?
A: In the serverless-workflows repository there is CI for testing some of its workflows, e.g.: https://github.com/rhdhorchestrator/serverless-workflows/blob/main/.github/workflows/mta-v7.x-e2e.yaml At first stage, it deploys SonataFlow on a cluster with the dependencies required for the test. Next, it deploys the workflow then configures it for the testing environment. Once the workflow is ready to be tested, we issue a REST call for invoking a workflow and verifying the result is the expected one https://github.com/rhdhorchestrator/serverless-workflows/blob/main/e2e/mta-v7.x-vm.sh
Workflow is executed from a single endpoint and represents a flow that depends on previous states. There is no API to invoke only part of a workflow.
In addition to end-to-end testing, when working with Quarkus-based workflow projects, you might also consider adding JUnit tests. While not testing the final target ecosystem, it can be useful to have an initial set of tests that validates the workflow in a more manageable environment. The drawback sometimes is that when your workflow accesses external services, unless you have available instances, you might need to Mock them. On the other hand, these mocks can be easily programmed to return the exact set of values you need for testing.
You can find some simple example here:
- https://github.com/kiegroup/kogito-examples/blob/192c5ec9b5b1700917b81f3198ce01275df483f0/serverless-workflow-examples/serverless-workflow-hello-world/src/test/java/org/kie/kogito/examples/HelloWorldTest.java
- https://github.com/apache/incubator-kie-kogito-examples/blob/a7fee0031bac658ebe266459f3bc1ae74777938f/serverless-workflow-examples/serverless-workflow-subflows-event/src/test/java/org/kie/kogito/examples/MasterWorkflowTest.java
- https://github.com/apache/incubator-kie-kogito-examples/blob/a7fee0031bac658ebe266459f3bc1ae74777938f/serverless-workflow-examples/serverless-workflow-subflows-event/src/test/java/org/kie/kogito/examples/MasterWorkflowTest.java
And more elaborated cases that we use in product here:
Building & Deployment
Q: How can we build an image for a YAML only workflow (kn workflow create)?
A: The build.sh script was extended to support a non-quarkus layout using flags -S or –non-quarkus.
Q: How to configure image pull credentials? Must the ServiceAccount be configured for registry access?
A: ImagePullSecret can be defined globally in the cluster for the entire cluster and not per-image. Please view: https://docs.redhat.com/en/documentation/openshift_container_platform/4.16/html/images/managing-images#images-update-global-pull-secret_using-image-pull-secrets
If there is a need to patch a resource after it was generated by the script, consider other methods such Kustomize or adding a patch command to edit the resource.
Q: What workflows do become part of the workflow deployment? Every file named *.sw.yaml or *.sw.json under src/main/resources?
A: The kn-workflow gen-manifest (the CLI to generate the manifests) expects only one sw.yaml or sw.json file. If there is more than a single file, the CLI will fail with:
❌ ERROR: generating manifests: ❌ ERROR: multiple SonataFlow definition files found
The reason for that is that the main workflow is translated into a SonataFlow CR that represents a single workflow.
If there is a need to add additional subflows, they can be placed in their own directory and referred by the kn-workflow gen-manifest CLI using the –subflows-dir flag
In that case, subflows will have to be placed under src/main/resources/subflows
Q: How can I lifecycle workflow / templates if there is a new version available?
A: It really depends on how the workflow is designed and implemented. A few options:
- declarative configuration which is synced via GitOps might be best if PR are issued to projects, using the template. The responsible developer team. or app owners should be responsible to implement the change and test it. Tool like renovatebot or dependabot might help here.
- update in workflows which are implemented in an imperative approach might need “update workflows” who help to bring out the changes from one version to the next one. Example could be database changes / patches to new api versions, etc.
In any case, with RHDH and Orchestrator you should be equipped to analyse which app is installed where in which version and then be able to plan next steps.
Q: Can we use the Quarkus extension for building workflow images or does the build.sh script more stuff then just building the image in the standard way?
A: The build.sh script isn’t a must. It offers an opinionated method to build workflows with specific Quarkus extensions that are recommended for production and enables the persistence.
The core part of building workflow is using the openshift-serverless-logic builder image as referenced in the build script here and here.
To build the workflow image it is enough to run (with all or part of the extensions, depends on your needs):
podman build \
 -f ../../orchestrator-demo/docker/osl.Dockerfile \
 --tag $TARGET_IMAGE \
  --platform linux/amd64 \
  --ulimit nofile=4096:4096 \
  --build-arg QUARKUS_EXTENSIONS="\
    org.kie:kie-addons-quarkus-persistence-jdbc:9.102.0.redhat-00005,\
    io.quarkus:quarkus-jdbc-postgresql:3.8.6.redhat-00004,\
    io.quarkus:quarkus-agroal:3.8.6.redhat-00004, \
    io.quarkus:quarkus-smallrye-reactive-messaging-kafka" \
  --build-arg MAVEN_ARGS_APPEND="\
    -DmaxYamlCodePoints=35000000 \
    -Dkogito.persistence.type=jdbc \
    -Dquarkus.datasource.db-kind=postgresql \
    -Dkogito.persistence.proto.marshaller=false" \
    .
Please note that these flags were correct at this point in time, and might be changed in the future.
There is a blog post that explains this into details.
Q: Best practices for building and deploying workflow?
Extended Q: When we implement our own workflow like in this example https://github.com/rhdhorchestrator/serverless-workflows/tree/main/workflows/experimentals/cluster-onboarding, how do we build and deploy such a workflow? Is there no JSON/YAML workflow specification involved when we write the workflow as code? Could we add a workflow spec and run other steps or would we install the code workflow and call it from another YAML workflow?
A: A better reference for learning about the build and deploy resource would be this repository: https://github.com/rhdhorchestrator/orchestrator-demo/
For instance, this example: https://github.com/rhdhorchestrator/orchestrator-demo/tree/main/02_advanced#building-the-workflow explains how to use a script for building the workflow, generate its manifests and deploy to the cluster.
There is no need to write a code other than:
- The workflow definition (yaml / json)
- The data input schema (json)
- The data output schema (json) - common for all workflows in the context of the Orchestrator
- The application.properties - for configuration
- The secret.properties - for sensitive information
- The required spec files for interacting with the external services
This is also described in two-series blog posts: One for using a script, and the other for using the build tools without the script.
Q: How can I build a workflow in the Orchestrator?
A: The Orchestrator is built on OpenShift Serverless and SonataFlow / Kogito. The Orchestrator “hooks” into the SonataFlow platform and can display, start, and show the output of workflows. Additionally, the operator Plugin provides a custom action that can be used to start workflows.
You cannot build workflows in the Orchestrator itself - the idea behind it is that an RHDH user (typically a developer) wants to use these flows, e.g., to provision external resources or similar - or they implicitly use them in the template and can then view a status (by the way, the Orchestrator also supports the RHDH RBAC model, so I can ensure that, for example, only users/groups that can see certain templates can also see corresponding workflows, etc.) To do this, you need to know that such a workflow (completely container-native, of course) always runs in a pod, is accessible via a service, and receives its schemas, properties, etc., via configMaps, for example.
In the simplest case (though not suitable for production), if the SonataFlow operator (or OpenShift Serverless Logic Operator) is installed, you can simply create a SonataFlow Custom Resource.
Examples can be viewed here:
- https://kiegroup.github.io/kogito-docs/serverlessworkflow/latest/cloud/operator/build-and-deploy-workflows.html#build-deploy-workflow
- https://sonataflow.org/serverlessworkflow/main
- https://sonataflow.org/serverlessworkflow/main/cloud/operator/deployment-profile.html
What then happens (in the background, through the operator):
- A build with a BuildConfig is started - the standard builder image and thus the standard runtime image can be adapted - by default these are maven/jdk and Quarkus images.
- When the build is finished, the workflow is started and the corresponding service and even a route are created (the route, i.e., the expose, can be suppressed).
- There is also a Development Profile - CAUTION, workflows in DevMode are not entered into the so-called “Data Index Service” and are therefore not visible in RHDH - you can test them, play with them, but not interact with them via the RHDH Orchestrator. https://kiegroup.github.io/kogito-docs/serverlessworkflow/latest/cloud/operator/developing-workflows.html
Authentication & Security
Q: How do you pass credentials to functions which are defined as OpenAPI spec?
A: The workflow is using a token which is defined on RHDH. This is supported by https://backstage.io/docs/auth/service-to-service-auth/#access-restrictions
In RHDH configmap there is the same section:
backend:
  auth:
    externalAccess:
      - type: static
        options:
          token: ${BACKEND_SECRET}
          subject: orchestrator
The value for BACKEND_SECRET is taken from a secret of RHDH, e.g. backstage-backend-auth-secret (if installed by the Orchestrator operator)
In the workflow, the secret is referenced from the application.properties property:
quarkus.rest-client.scaffolder_openapi_yaml.url=${RHDH_URL}
quarkus.openapi-generator.scaffolder_openapi_yaml.auth.BearerToken.bearer-token=${SCAFFOLDER_BEARER_TOKEN}
The first one points to RHDH_URL (should use the internal service and not the openshift route to avoid certificate issues)
The second property points to the value taken from the BACKEND_SECRET.
The application.properties is translated to the configmap that its name ends with -props. The value for the variable is taken from the secret.properties that is being translated into a secret
Integration & APIs
Q: How can I add Quarkus extensions to workflows?
A: When running the workflow locally using maven, the extensions are added to pom.xml (either directly or by quarkus ext add).
When workflow is built in the workflow, the QUARKUS_EXTENSIONS env var is used to add additional dependencies for the build process.
e.g:
QUARKUS_EXTENSIONS="io.quarkus:quarkus-agroal,io.quarkus:quarkus-jdbc-mysql" ~/projects/orchestrator-demo/scripts/build.sh --image=registry.internal/workflows/dbsetup:latest -P
Q: About catalog-info.yaml and Developer Hub entity model: If we want to bring in our own asset data, do we need to make sure it is exported into the specific Developer Hub format (yaml syntax)?
A: Developer Hub implements the default backstage entity model, which is also used by many plugins as a baseline to identify resources (https://backstage.io/docs/features/software-catalog/system-model/). Red Hat suggestion is to use the standard model, which then ensures best possible compatibility and future readiness. So the simplest way is then to extract the needed data and transform/format it into the default yaml syntax. If systems should be integrated which do already have its own data model and act as a single source of truth another option
Q: How can I tell in the workflow which OpenAPI Spec should use which Rest Client?
To configure the endpoints, you must use the sanitized OpenAPI specification file name as the REST client configuration key. The configuration key must be set as a valid environment variable. For example, a file named as subtraction.yaml contains the configuration key as subtraction_yaml. For more information about how to sanitize file names, see Environment Variables Mapping Rules.
All Quarkus configuration originated in Quarkus, e.g for the rest-client: https://quarkus.io/guides/rest-client#create-the-configuration
Each spec file represent a system. In the workflow, the functions section defines the APIs of that service from the spec by referencing to it. In the application.properties we match between the spec file to the URL of the service and its authentication.
Q: How do we call the Scaffolder from a workflow? Is there an example somewhere?
A: Here is an example for running a software template from a workflow: https://github.com/rhdhorchestrator/orchestrator-demo/blob/main/05_software_template_hello_world/workflow/src/main/resources/workflow.sw.yaml
This is the scaffolder OpenAPI spec: https://github.com/rhdhorchestrator/orchestrator-demo/blob/main/05_software_template_hello_world/workflow/src/main/resources/specs/scaffolder-openapi.yaml
Please note that the argument for the software templates aren’t part of the API and should be provided as arguments according to the software template definition, e.g. https://github.com/rhdhorchestrator/orchestrator-demo/blob/main/05_software_template_hello_world/workflow/src/main/resources/workflow.sw.yaml
One option to capture the exact list of arguments is by looking at the template definition. Another option is to invoke a software template from the browser, enable web-tools in-browser (before invocation), switch to network tab and “copy as curl command” - this shows exactly how the software template was called via the API and this will be done the same from a workflow. The input values will have to be defined in the input schema of the workflow (unless we want to calculate them in-workflow and not to be provided by the user)
Q: How to integrate own CustomActions?
A: Since RHDH is not rebuilt, we cannot make any code changes, just like custom plugins, as dynamic plugins. The question aims at creating resources for which there is no template action yet - in that case, you would rather go the way of a workflow in the Orchestrator, which you can address via a template action.
For example:
- id: trigger-workflow
  name: Execute Orchestrator Workflow
  action: orchestrator:run
  input:
    workflowId: ${{ parameters.workflowId }}
    parameters: ${{ parameters.workflowParameters }}
    waitForCompletion: true
    timeout: 300
But - both are possible, many roads lead to Rome (the Orchestrator’s Template Action also comes from the Orchestrator Backend Plugin).
- https://backstage.io/docs/features/software-templates/writing-custom-actions/
- https://backstage.io/docs/reference/plugin-scaffolder-backend-module-gitlab/
If there is a backend plugin in backstage to support the action, and it exposes a REST API for it, by creating OpenAPI spec for it or using the rest option, a call can be made to it. If there isn’t only by leveraging a software template for calling it we are invoking software templates and sending notifications from workflows by using the scaffolder-backend plugin and the notifications-backend plugin. If there is a backend plugin and exposed API - the workflow should be able to call it.
UI & User Experience
Q: How to use the Notification Plugin?
A: There is a need to enable also the backstage-plugin-notifications-backend-module-email-dynamic plugin. See more details about the email plugin here: https://docs.redhat.com/en/documentation/red_hat_developer_hub/1.6/html/dynamic_plugins_reference/con-preinstalled-dynamic-plugins#rhdh-tech-preview-plugins
and here:
The user/group entity in backstage must have an email address set. See https://backstage.io/docs/features/software-catalog/descriptor-format/#kind-user
Q: What UI widgets can I use? How do I populate the User/Owner in the widget?
A: The documentation for this are here https://github.com/redhat-developer/rhdh-plugins/blob/main/workspaces/orchestrator/docs/orchestratorFormWidgets.md
It is an additional plugin that serves that extensible UI capabilities (part of the Orchestrator). The current released version is 1.6.0 and nowadays we’re working on 1.6.1 to fix minor issues.
Here is an example to populate the User: Using backstage catalog backend OpenAPI spec can be found here:
curl -s -k 'https://{backstage-url}/api/catalog/openapi.json' \
 -H 'Authorization: Bearer...'
From that spec you can learn how to fetch entities, e.g. to fetch User or Groups use:
/api/catalog/entities?filter=kind=user,kind=group
From the data input schema use this as the fetch:url value:
"$schema": "http://json-schema.org/draft-07/schema#",
    "type": "object",
    "properties": {
      "selectUser": {
        "type": "string",
        "title": "Please enter user name. Start typing for autocompletion",
        "ui:widget": "ActiveTextInput",
        "ui:props": {
          "fetch:url": "$${{backend.baseUrl}}/api/catalog/entities?fields=metadata.name&filter=kind=user,kind=group",
          "fetch:response:value": "$map($, function($v) { $lowercase($v.kind) & ':' & $v.metadata.namespace & '/' & $v.metadata.name })",
          "fetch:response:autocomplete": "$map($, function($v) { $lowercase($v.kind) & ':' & $v.metadata.namespace & '/' & $v.metadata.name })",
          "fetch:method": "GET",
          "fetch:headers": {
            "Authorization": "Bearer $${{identityApi.token}}"
          }
        }
      }
    }
Example can be found here: https://github.com/rhdhorchestrator/serverless-workflows/commit/d92916902b16427a936cb9abf7ebfa4c9f229c46
Parsing the response from the fetch:url is done using JSONATA.
This is a useful tool for evaluating the expressions: https://try.jsonata.org/
Subflows
Q: Is it possible to create modularized workflows and call these as a sub-workflow from another workflow?
A: The serverless workflow specification supports subflows - https://github.com/serverlessworkflow/specification/blob/0.8.x/specification.md#subflow-action.
Each workflow can include many sub-flows built into the same build image with the main workflow.
The subflow are internal to the workflow and are not exposed as the main workflow. The definition itself can be shared between multiple workflows at build time, but at runtime the sub-flows aren’t exposed.
Q: Do all subflows have to be in the same deployment? Can we deploy workflows separately? How would then the subFlowRef be resolved or how would we call other workflows?
A: Deployment represents a single workflow. For calling subflows from the main workflow, all subflows need to be built into the same image of the calling workflow.
Subflows aren’t shown in the Data Index, therefore not shown in the Orchestrator plugin. Please take a look here for a more detailed example on subflows.
Q: How do the subflows work in this example?
Extended Q: How are workflowA and workflowB started in the subflow example https://github.com/apache/incubator-kie-kogito-examples/blob/main/serverless-workflow-examples/serverless-workflow-subflows-event/src/main/resources/master.sw.json ?
In the master workflow, there are only two states: “setup” and “waitForEvents”. ‘Wait for events’ implies that we only wait for something. So where are workflowA and workflowB started?
How are events related to subworkflows? Are events required? Is the call to setup synchronous?
A: From the README (https://github.com/apache/incubator-kie-kogito-examples/tree/main/serverless-workflow-examples/serverless-workflow-subflows-event): This example illustrate how to trigger workflows manually with additional parameters calculated by an initial workflow. The workflow responsible for setting up the parameters is executed as the start state. Then, all possible workflows that might be instantiated with those parameters are registered using event state. exclusive property is set to false ensuring that the process instance remains active till all possible workflows has been executed.
So when the workflow is started, it setup things and then waits for events. The workflowA and B are “started” when receiving their corresponding event defined by eventRefs field. Until both events are received, the workflow will be waiting for the remaining events.
Architecture & Infrastructure
Q: What is a SonataFlow, SonataPlatform, SonataClusterPlatform, etc.?
A: The SonataFlow operator (upstream name of the OpenShift Serverless Logic Operator) defines the following custom resource definitions:
- SonataFlow - the resource that defines the workflow and its profile - https://sonataflow.org/serverlessworkflow/main/cloud/operator/deployment-profile.html
- SonataFlowPlatform - It’s a singleton per namespace, used to configure the workflows and manage and configure the shared services. It supports configuration for eventing, persistences, monitoring. See https://sonataflow.org/serverlessworkflow/latest/cloud/operator/supporting-services.html#deploy-supporting-services
- SonataFlowClusterPlatform - it is the cluster-wide equivalent of SonataFlowPlatform. While SonataFlowPlatform applies to a single namespace, the SonataFlowClusterPlatform resource is designed to provide a shared configuration across multiple namespaces in OpenShift cluster. Find more here: https://sonataflow.org/serverlessworkflow/latest/cloud/operator/supporting-services.html#cluster-scoped-eventing-system-configuration
Q: Are there central parts which are shared between all workflows (apps)? E.g. data index? How do workflows communicate/connect to it?
A: Yes, SonataFlow defines several shared infrastructure components that serve all deployed workflows across the system. These shared services are crucial for execution, observability, and coordination.
- Data Index Service (sonataflow-data-index)
- Acts as a centralized state store and query layer for all workflow instances.
- Exposes GraphQL and/or REST APIs to query the state, variables, and lifecycle events of workflows.
- Used for Monitoring workflow executions (e.g., in consoles or dashboards) and Searching workflows by business key or input data
- Find more on https://sonataflow.org/serverlessworkflow/main/data-index/data-index-core-concepts.html
- The SonataFlow Jobs Service is responsible for time-based actions
- Triggering timed events in workflows, such as timeouts or time-based transitions
- Find more on https://sonataflow.org/serverlessworkflow/main/job-services/core-concepts.html
The communication between workflows to the shared services is done by cloud events. Based on platform level (shared configuration for all workflows either in a single namespace or a global one), the operator adds the required properties for workflow to interact with the services. See more about the supported configuration at https://sonataflow.org/serverlessworkflow/main/use-cases/advanced-developer-use-cases/job-service/quarkus-extensions.html#job-service-quarkus-extensions
More about the supporting services can be found here: https://sonataflow.org/serverlessworkflow/latest/cloud/operator/supporting-services.html
Q: How to handle operator created resources?
A: Manage the inputs (Backstage CR and referenced ConfigMaps), not the operator’s generated outputs. Create your own ConfigMaps for app-config.yaml (and auth fragments), reference them from the Backstage CR, and keep both the CR and those ConfigMaps under Git. Do not hand‑edit the operator’s default app-config-* ConfigMaps—the operator may recreate or override them on restart. https://docs.redhat.com/en/documentation/red_hat_developer_hub/1.5/html-single/configuring_red_hat_developer_hub/index.xml
Application config
- Create a ConfigMap (e.g., my-rhdh-app-config) that contains your app-config.yaml.
- Reference it from the Backstage CR: spec.application.appConfig.configMaps.
- Keep both the ConfigMap manifest and the Backstage CR in your Git repo (and sync with Argo CD). This is the supported way to customize RHDH without changing operator‑owned ConfigMaps.
Auth and other fragments If you split auth/config into separate fragments (e.g., an “auth” ConfigMap), add it to the same list in the Backstage CR (spec.application.appConfig.configMaps) so the operator mounts all of them. (The official examples show adding additional ConfigMaps there.)
Dynamic plugin configuration (including Orchestrator UI) Store dynamic plugin settings in a ConfigMap (commonly dynamic-plugins-rhdh) and reference it from the Backstage CR via spec.application.dynamicPluginsConfigMapName. Keep it in Git. redhat-developer.github.io
Extra files & secrets If you need to mount additional files beyond app-config.yaml (for example, CA bundles, RBAC policies, or other files), use spec.application.extraFiles in the Backstage CR - again, declared as ConfigMaps/Secrets that you version in Git.
Orchestrator plugin explicitly recommends GitOps approach (Deployment with GitOps): https://www.rhdhorchestrator.io/main/docs/installation/orchestrator/?utm_source=chatgpt.com
Advanced Topics & Troubleshooting
Q: How to implement custom logic for DB capability?
A: Java Module or Connectors with Camel K.
Q: How do we properly uninstall a workflow?
A: In SonataFlow, clean up of workflows and their runs is done via the DB, to preserve auditing information. Therefore, even removal of workflows resources (SonataFlow CR, CM, secrets) from the cluster will not influence their appearances in DI. This information is required for auditing purposes, e.g. maintaining the history of workflow runs.
In Orchestrator 1.6 the workflow will be shown as unavailable. In Orchestrator 1.7 deleted workflows will be filtered from the UI - tracked by this issue.
Q: How to most easily implement prod DB approval process?
A: Here is Example Scaffolding Template which generates 2 git repos - source code and *-gitops for kubernetes manifests - Red Hat Best Practice: https://github.com/idp-team/software-templates/tree/master/scaffolder-templates/quarkus-web-template
Q: How to add custom Java code / classes?
A: Follow this example: https://sonataflow.org/serverlessworkflow/main/core/custom-functions-support.html#con-func-java
The class needs to be defined with a full qualifier (have a package defined that matches the one referenced from the workflow as well).
In addition, the class needs to be annotated with @ApplicationScoped or @Dependent for the CDI to dynamically load it.
Q: How do I implement my own logic, with Quarkus Apps or can I use my own images?
A:
- The general workflow logic should be described in YAML - then you can also view it in the Orchestrator, for example (or visualize it with other tools).
- In your image, you can do whatever you want. Here are a few examples: https://github.com/rhdhorchestrator/serverless-workflows/tree/main/workflows/experimentals
If you don’t want to leave it to the operator which image it uses for building and for runtime, then there is a blog post with explanations and links to scripts, etc. - these build everything together and with that you then have full control and can also build your own functions, which you then call from your YAML flow: https://www.rhdhorchestrator.io/blog/building-and-deploying-workflows/
Note - of course, you can also build the entire logic as an application and pack it into your image and then just call “magic_kicks_in_here” from your flow, but then that’s no longer a workflow - the boundaries are fluid, but you should ideally not put logic into your code, but only functions: https://www.rhdhorchestrator.io/1.6/docs/
Template for New Q&A Entries
When adding new questions, use this template for consistency:
<details>
<summary><strong>Q: [Your question here in clear, concise language]</strong></summary>

**A:** [Your detailed answer here]

Key points:

- Point 1
- Point 2
- Point 3

```yaml
# Include relevant code/configuration examples
apiVersion: example/v1
kind: Example
metadata:
  name: sample
```
Contributing to this Q&A
Found a question that’s not covered? Please:
- Check existing questions first
- Follow the template format above
- Include practical examples where applicable
- Link to relevant documentation
- Test any code snippets before adding them
Hacking The Build and Deployment Process of Serverless Workflows
Hacking The Build and Deployment Process of Serverless Workflows
In this guide, we’ll dive under the hood of the serverless workflow build process, examine how it works internally, and learn how to take control of it when needed.
The Problem
We’re working with a repository that contains an issue with the standard workflow build script described in our previous post.
Prerequisites
- Have kn-workflow CLI installed from official link with version >= v1.36.
- Have a kafka cluster running on an OCP cluster
- Have RHDH and the orchestrator installed
Generating Manifests with the kn-workflow CLI
The kn-workflow CLI serves multiple purposes in development, testing, and deployment. For our needs, we’ll use it solely to generate Kubernetes manifests.
To generate the manifests run:
TARGET_IMAGE=<image:tag> # e.g. quay.io/orchestrator/demo-poc-kafka-logic:latest
git clone https://github.com/masayag/poc-kafka-logic-operator
cd poc-kafka-logic-operator/callback-flow/src/main/resources
kn-workflow gen-manifest --profile gitops --image $TARGET_IMAGE
After running this command, you should see these files in the manifests directory:
manifests
├── 01-configmap_lock-flow-props.yaml
└── 02-sonataflow_lock-flow.yaml
These files alone won’t be sufficient for a successful deployment. We’ll make additional changes after building the workflow image.
For now, let’s verify the 02-sonataflow_lock-flow.yaml contains a reference to our workflow image (required for the gitops profile):
  podTemplate:
    container:
      image: quay.io/orchestrator/demo-poc-kafka-logic:latest
      resources: {}
Building the Workflow Image Using Dockerfile
Let’s build the workflow image using podman on a Linux machine. Navigate to the poc-kafka-logic-operator/callback-flow directory and run:
podman build \
  -f ../../orchestrator-demo/docker/osl.Dockerfile \
  --tag $TARGET_IMAGE \
  --platform linux/amd64 \
  --ulimit nofile=4096:4096 \
  --build-arg QUARKUS_EXTENSIONS="\
    org.kie:kie-addons-quarkus-persistence-jdbc:9.102.0.redhat-00005,\
    io.quarkus:quarkus-jdbc-postgresql:3.8.6.redhat-00004,\
    io.quarkus:quarkus-agroal:3.8.6.redhat-00004, \
    io.quarkus:quarkus-smallrye-reactive-messaging-kafka" \
  --build-arg MAVEN_ARGS_APPEND="\
    -DmaxYamlCodePoints=35000000 \
    -Dkogito.persistence.type=jdbc \
    -Dquarkus.datasource.db-kind=postgresql \
    -Dkogito.persistence.proto.marshaller=false" \
    .
Note that for this particular workflow, we needed to include an additional Quarkus extension: io.quarkus:quarkus-smallrye-reactive-messaging-kafka.
Once built, push the image to your registry:
podman push $TARGET_IMAGE
Editing the Manifests
Now we need to enhance our manifests to make them production-ready.
Enable Persistence
In production environments, we want to enable persistence for our workflow. This can be configured either at the platform level or per workflow. See the Sonataflow documentation for enabling persistence for more details.
For our workflow, persistence configuration is required since we included Quarkus persistence extensions in the build command.
Edit src/main/resources/manifests/02-sonataflow_lock-flow.yaml and add this section at the same level as the podTemplate:
  persistence:
    postgresql:
      secretRef:
        name: sonataflow-psql-postgresql
        userKey: postgres-username
        passwordKey: postgres-password
      serviceRef:
        name: sonataflow-psql-postgresql
        port: 5432
        databaseName: sonataflow
        databaseSchema: lock-flow
Also, add the following property to the configmap manifest 01-configmap_lock-flow-props.yaml to enable Flyway migrations
kie.flyway.enabled = true
Add Secrets for TLS Support
To enable TLS, we need to mount a secret with the truststore to the workflow deployment. Add this under the podTemplate property:
  podTemplate:
    container:
      image: quay.io/orchestrator/demo-poc-kafka-logic:latest
      volumeMounts:
        - name: truststore-volume
          mountPath: /deployment/certs
          readOnly: true
      resources: {}
    volumes:
      - name: truststore-volume
        secret:
          secretName: kafka-truststore
Let’s update the configmap again, with TLS configuration this time:
    # TLS support
    kafka.bootstrap.servers=<kafka-bootstrap-service>:<tls-port>
    mp.messaging.connector.smallrye-kafka.security.protocol=SSL
    # Specify the enabled TLS protocols (forcing TLSv1.2)
    mp.messaging.connector.smallrye-kafka.ssl.enabled.protocols=TLSv1.2

    # Truststore configuration (so the client can validate the broker's certificate)
    mp.messaging.connector.smallrye-kafka.ssl.truststore.location=/deployment/certs/truststore.jks
    mp.messaging.connector.smallrye-kafka.ssl.truststore.password=password
For mTLS (mutual TLS), similar adaptations would be needed.
Deploying the Manifests to the Cluster
Here’s the complete configmap with all our changes:
kind: ConfigMap
apiVersion: v1
metadata:
  name: lock-flow-props
  namespace: sonataflow-infra
  labels:
    app: lock-flow
    app.kubernetes.io/component: serverless-workflow
    app.kubernetes.io/managed-by: sonataflow-operator
    app.kubernetes.io/name: lock-flow
    sonataflow.org/workflow-app: lock-flow
    sonataflow.org/workflow-namespace: sonataflow-infra
data:
  application.properties: |
    kie.flyway.enabled = true

    # Note the topic property; If your broker has different topic names you can change this property.
    mp.messaging.incoming.lock-event.connector=smallrye-kafka
    mp.messaging.incoming.lock-event.value.deserializer=org.apache.kafka.common.serialization.ByteArrayDeserializer
    mp.messaging.incoming.lock-event.topic=lock-event

    mp.messaging.incoming.release-event.connector=smallrye-kafka
    mp.messaging.incoming.release-event.value.deserializer=org.apache.kafka.common.serialization.ByteArrayDeserializer
    mp.messaging.incoming.release-event.topic=release-event

    mp.messaging.outgoing.released-event.connector=smallrye-kafka
    mp.messaging.outgoing.released-event.value.serializer=org.apache.kafka.common.serialization.StringSerializer
    mp.messaging.outgoing.released-event.topic=released-event

    mp.messaging.outgoing.notify-event.connector=smallrye-kafka
    mp.messaging.outgoing.notify-event.value.serializer=org.apache.kafka.common.serialization.StringSerializer
    mp.messaging.outgoing.notify-event.topic=notify-event

    quarkus.kafka.devservices.enabled=false

    # TLS support
    kafka.bootstrap.servers=<kafka-bootstrap-service>:<tls-port>
    mp.messaging.connector.smallrye-kafka.security.protocol=SSL
    # Specify the enabled TLS protocols (forcing TLSv1.2)
    mp.messaging.connector.smallrye-kafka.ssl.enabled.protocols=TLSv1.2

    # Truststore configuration (so the client can validate the broker's certificate)
    mp.messaging.connector.smallrye-kafka.ssl.truststore.location=/deployment/certs/truststore.jks
    mp.messaging.connector.smallrye-kafka.ssl.truststore.password=password
Make sure to update the Kafka configuration, referenced secret path, and password to match your environment.
Here’s the complete SonataFlow CR with our additions:
  podTemplate:
    container:
      image: quay.io/orchestrator/demo-poc-kafka-logic:latest
      volumeMounts:
        - name: truststore-volume
          mountPath: /deployment/certs
          readOnly: true
      resources: {}
    volumes:
      - name: truststore-volume
        secret:
          secretName: kafka-truststore
  persistence:
    postgresql:
      secretRef:
        name: sonataflow-psql-postgresql
        userKey: postgres-username
        passwordKey: postgres-password
      serviceRef:
        name: sonataflow-psql-postgresql
        port: 5432
        databaseName: sonataflow
        databaseSchema: lock-flow
Now we can deploy the manifests to the cluster. The files are numbered for a reason - the configmap must be applied first, otherwise, the SonataFlow operator will generate an empty configmap for the workflow:
oc apply -f manifests/01-configmap_lock-flow-props.yaml -n sonataflow-infra
oc apply -f manifests/02-sonataflow_lock-flow.yaml -n sonataflow-infra
Let’s watch for the workflow pod status to verify it’s running:
oc get pod -n sonataflow-infra -l app=lock-flow
You should see output like this:
NAME                        READY   STATUS    RESTARTS   AGE
lock-flow-5cbd5dbdb-2g7wz   1/1     Running   0          13m
Testing the Workflow
Now we can test the workflow by emitting cloud events to trigger it. Note that in this example, we’re not using the Orchestrator to invoke workflows, since it can only invoke workflows via HTTP endpoints. However, we can monitor the workflow’s progress from the workflow runs tab.
Setting Up the Kafka Producer with TLS
To invoke the workflow, we’ll use Kafka’s producer script. Since we’re using TLS, we need to have the truststore.jks file available.
In this example, we’re using Kafka installed on an OpenShift cluster with the Strimzi operator.
First, copy or mount the truststore.jks file to the Kafka cluster broker pod.
Then create a properties file at /tmp/client-ssl.properties:
cat <<EOF > /tmp/client-ssl.properties
security.protocol=SSL
ssl.truststore.location=/tmp/truststore.jks
ssl.truststore.password=password
ssl.enabled.protocols=TLSv1.2,TLSv1.1,TLSv1
ssl.protocol=TLS
EOF
Triggering the Workflow
The workflow is started by producing the lock event and finalized by producing the release event.
Step 1: Send the Lock Event
Now invoke the Kafka producer to produce the lock event, make sure to set the bootstrap server properties:
echo '{"specversion":"1.0","id":"db16ff44-5b0b-4abc-88f3-5a71378be171","source":"http://dev.local","type":"lock-event","datacontenttype":"application/json","time":"2025-03-07T15:04:32.327635-05:00","lockid":"03471a81-310a-47f5-8db3-cceebc63961a","data":{"name":"The Kraken","id":"03471a81-310a-47f5-8db3-cceebc63961a"}}' |
  ./bin/kafka-console-producer.sh \
  --bootstrap-server <kafka-bootstrap-service>:<tls-port> \
  --topic lock-event \
  --producer.config /tmp/client-ssl.properties
Once sent, you can verify that the workflow is in an “Active” state in the Orchestrator plugin.
Step 2: Send the Release Event
Next, invoke the Kafka producer to produce the release event, make sure to set the bootstrap server properties:
echo '{"specversion":"1.0","id":"af0a7e67-e2b8-484f-9bc1-6047d53b5d04","source":"http://dev.local","type":"release-event","datacontenttype":"application/json","time":"2025-03-07T15:05:54.636406-05:00","lockid":"03471a81-310a-47f5-8db3-cceebc63961a","data":{"name":"The Kraken","id":"86ebe1ee-9dd2-4e9b-b9a2-38e865ef1792"}}' |
  ./bin/kafka-console-producer.sh \
  --bootstrap-server <kafka-bootstrap-service>:<tls-port> \
  --topic release-event \
  --producer.config /tmp/client-ssl.properties
After sending this event, you can observe the workflow complete its execution in the Orchestrator dashboard.
You can view the last event produced by the workflow in Kafka by:
./bin/kafka-console-consumer.sh <kafka-bootstrap-service>:<tls-port> \
  --topic released-event \
  --from-beginning \
  --consumer.config /tmp/client-ssl.properties
Conclusion
By following this guide, you’ve learned how to:
- Generate and customize Kubernetes manifests for workflow deployment
- Enable critical production features like persistence and TLS security
- Test Kafka-based workflows using cloud events
These techniques allow you to deploy complex workflows even when standard tools encounter compatibility issues, giving you more control over your serverless infrastructure.
References
More information about Soantaflow and Kafka can be found here.
Acknowledgments
Special thanks to Ricardo Zanini for creating the original repository example that was used throughout this tutorial. His work provides an excellent foundation for exploring serverless workflow implementation in development mode and with the preview profile.
Installing Orchestrator via the Red Hat Developer Hub Helm Chart
Installing Orchestrator via the Red Hat Developer Hub Helm Chart
This blog introduces a streamlined installation method that allows users to deploy Orchestrator alongside Red Hat Developer Hub (RHDH) using a Helm Chart and with minimal configuration and effort.
With this approach, the Orchestrator Plugins are installed directly within RHDH and deployed to a single target namespace. As a result, all RHDH components, Openshift Serverless Logic platform services, and serverless workflows coexist within the same namespace, simplifying the deployment footprint and operational model.
A brief explanation of Orchestrator components is given to clarify any gaps before advancing in comparing the different installation types.
Background: Orchestrator Components
Orchestrator utilizes several components to build, serve, run and present serverless workflows, for example:
Red Hat Developer Hub (RHDH): This component acts as the UI, serving the Orchestrator plugins which allows the users to launch, monitor and manage workflows. On RHDH, users can launch software templates, such as the orchestrator’s software templates which build serverless workflow projects. RHDH also integrates the ArgoCD and Tekton plugins, allowing for monitoring associated projects to the RHDH and Orchestrator instance. On RHDH, the notifications plugin can be configured, to be used with serverless workflows that send notifications.
Openshift Serverless Logic (OSL): This operator serves as the backend engine for running serverless workflows. Orchestrator uses OSL’s sonataflow platform resources to launch and deploy workflows, and acts as the bridge between RHDH and OSL. Orchestrator is responsible for installing and configuring this operator.
Openshift Serverless: This operator manages Knative-Eventing and Knative-Serving services, which allow handling event-driven communication from workflows, and provide the capability to deploy and scale stateless services on demand, respectively. Orchestrator is responsible for installing and configuring this operator.
Background: RHDH Helm Chart
The RHDH Helm Chart allows users to install Red Hat Developer Hub on an OpenShift or Kubernetes cluster. RHDH can be enriched with custom plugins, extended configurations, and integrated with developer tools such as GitHub, GitLab, ArgoCD, and Tekton.
Comparing to the Orchestrator Operator
Until recently, the only supported way to install Orchestrator was through the Orchestrator Operator, available in the Operator Catalog for OpenShift clusters. Now, with the introduction of a Helm chart alternative, users have a more flexible installation option. While both methods enable the core capabilities of Orchestrator, they differ in architecture, permissions, and deployment scope. This section highlights the key similarities and differences between the two approaches.
Similarity
The core functionality of Orchestrator is available in both installation methods:
- The Orchestrator plugins as add-ons for RHDH are included
- The ability to run and monitor Serverless Workflows (via OpenShift Serverless Logic)
- Software templates and integration with Openshift Pipelines and Openshift Gitops.
Differences
Feature Trimming
- Installing Orchestrator via the RHDH Helm Chart no longer installs by default all components that were previously bundled in the Orchestrator Operator. Instead, deploying features like integration with Openshift-Gitops, Openshift-Pipelines, and software templates are handled by separate Helm Charts and are configured post-install.
Permissions
- Using Orchestrator no longer requires cluster-wide permissions, and can now operate fully within a single namespace.
- Admin-level permissions are only required for installing the Openshift Serverless and Openshift Serverless Logic operators and the cluster-wide Knative services.
- To use the Orchestrator, only namespace-scope permissions are required, both for installing an RHDH instance and for deploying and running workflows.
For more information on required infrastructure that requires Admin-level permissions, please advise theorchestrator-infra chart.
Deployment Scope
- All components (Orchestrator, RHDH, workflows) are now deployed within a single namespace.
- This simplifies resource management and access control.
Installation Method
- Previously installed via a dedicated Operator available in Operator Hub.
- For now installed via Helm Charts (
backstageandorchestrator-infra).
Meta-Operator Behavior
- Orchestrator no longer acts as a meta-operator.
- It no longer installs the RHDH operator, rather the RHDH chart installs Orchestrator related resources.
- It still installs OpenShift Serverless and Serverless Logic Operators, but does so via the
orchestrator-infrachart.
Software Templates
- Workflow project software templates are no longer installed by default when using the Helm chart. To include them, some post setup is required and is detailed below.
Comparing Operator and Helm Chart
| Feature / Aspect | Orchestrator Operator | Helm Chart |
|---|---|---|
| Installs RHDH | Yes (Orchestrator acts as a meta-operator) | Yes (The backstage chart installs RHDH and Orchestrator) |
| Privileges | Requires cluster-wide permissions | Namespace-scoped; elevated permissions isolated in orchestrator-infra |
| Scope | Multi-namespace deployment | Single namespace for Orchestrator, RHDH, and workflows |
| Operator Management | Installs RHDH and other operators | Delegates operator installation to orchestrator-infra chart |
| Meta-Operator Behavior | Yes (controls RHDH and related operator installs) | No (installation responsibilities are split and explicit) |
| Software Templates | Installed by default | Not installed by default |
Using backstage chart to install Orchestrator
The full Installation steps can be found in the RHDH Chart README
Post-install configurations
// Work in progress
Dynamic Plugins
Optionally, some workflows that users may use will send notifications to RHDH during their run. To run these types of workflows with Orchestrator, some additional plugins are required to be activated to allow Orchestrator to function. Please add these plugins to the values.yaml file used in the RHDH chart:
    plugins:
      - disabled: false
        package: "./dynamic-plugins/dist/backstage-plugin-notifications"
      - disabled: false
        package: "./dynamic-plugins/dist/backstage-plugin-signals"
      - disabled: false
        package: "./dynamic-plugins/dist/backstage-plugin-notifications-backend-dynamic"
      - disabled: false
        package: "./dynamic-plugins/dist/backstage-plugin-signals-backend-dynamic"
Building and Deploying Serverless Workflows
The Orchestrator provides a way to run workflows directly from Backstage/RHDH. But how do these workflows actually become available in Backstage?
This blog will take you through the journey from running a workflow locally on your machine to having it deployed on a cluster and available in the Orchestrator plugin.
Note: This blog focuses on the build and deploy process, not workflow development itself. If you’re looking for workflow development resources, there are guides available online.
We’ll use the orchestrator-demo repository for all examples, tools, directory structures, and references throughout this blog.
The main goal of the orchestrator-demo repo is to showcase interesting use cases of the Orchestrator. Using tools from that repo, we’ll show how to:
- Build workflow images
- Generate workflow manifests
- Deploy workflows to a cluster
And the best part? You can do it all from a single script.
🚀 Why Build Workflow Images?
You might wonder: why bother building images when the OpenShift Serverless Logic Operator can build workflows on the fly?
There are a couple of reasons:
- Production readiness: Prebuilt images can be scanned, secured, and tested before going live.
- GitOps compatibility: The Orchestrator relies on a central OpenShift Serverless Logic Operator instance to track workflows and their states. To use this central tracking service, workflows need to be deployed with the
gitopsprofile, which expects a prebuilt image. - Testing & quality: Just like any other software, workflows should be tested before deployment. Building an image gives us more control over that process.
On-the-fly builds (preview profile) are great for experimentation—but for production, prebuilding is the way to go.
Find more about building workflows on the fly here.
Now that we understand why we build workflow images, let’s look at how it’s done.
🧱 Project Structure
We’ll focus on a Quarkus project layout (Maven project structure), specifically the 01_basic workflow example:
01_basic
├── pom.xml
├── README.md
└── src
    └── main
        ├── docker
        │   ├── Dockerfile.jvm
        │   ├── Dockerfile.legacy-jar
        │   ├── Dockerfile.native
        │   └── Dockerfile.native-micro
        └── resources
            ├── application.properties
            ├── basic.svg
            ├── basic.sw.yaml
            ├── schemas
            │   ├── basic__main-schema.json
            │   └── workflow-output-schema.json
            └── secret.properties
This structure was generated using the kn-workflow CLI.
You can try it yourself by following the Getting Started guide.
The main workflow resources are located under src/main/resources/.
🛠️ Building Locally
We use the build script to handle everything.
You can run it either locally or inside a container (see the documentation for containerized execution).
Let’s explore running it locally.
First, clone the project:
git clone git@github.com:rhdhorchestrator/orchestrator-demo.git
cd orchestrator-demo
Check out the script’s help menu:
./scripts/build.sh --help
🧾 What the script does:
This script does the following (in order):
- Generates workflow manifests using the
kn-workflowCLI (requires version 1.35.0) - Builds the workflow image with
podmanordocker - Optionally pushes the image to an image registry and deploys the workflow using
kubectl
🔧 Script usage:
./scripts/build.sh [flags]
Important Flags:
| Flag | Description |
|---|---|
-i, --image (required) | Full image path, e.g. quay.io/orchestrator/demo:latest |
-w, --workflow-directory | Workflow source directory (default: current directory) |
-m, --manifests-directory | Where to save generated manifests |
--push | Push the image to the registry |
--deploy | Deploy the workflow |
-h, --help | Show help message |
💡 The script also supports builder/runtime image overrides, namespace targeting, and persistence flags.
Environment Variables Supported by the Build Script
The build script supports environment variables to customize the workflow build process without modifying the script itself.
QUARKUS_EXTENSIONS
Specifies additional Quarkus extensions required by the workflow.
- Format: Comma-separated list of fully qualified extension IDs.
- Example:
export QUARKUS_EXTENSIONS="io.quarkus:quarkus-smallrye-reactive-messaging-kafka" - Use Case: Add Kafka messaging support or other integrations at build time.
MAVEN_ARGS_APPEND
Appends additional arguments to the Maven build command.
- Format: String of Maven CLI arguments.
- Example:
export MAVEN_ARGS_APPEND="-DmaxYamlCodePoints=35000000" - Use Case: Control build behavior, e.g., set
maxYamlCodePointsparameter that contols the maximum input size for YAML input files to 35000000 characters (~33MB in UTF-8).
🧰 Required tools:
| Tool | Purpose |
|---|---|
| podman or docker | Container runtime for building images |
| kubectl | Kubernetes CLI |
| yq | YAML processor |
| jq | JSON processor |
| curl, git, find, which | Shell utilities |
| kn-workflow | CLI for generating workflow manifests |
✅ Example: Building the 01_basic Workflow
Now, let’s build the 01_basic workflow image:
./scripts/build.sh --image=quay.io/orchestrator/demo-basic:test -w 01_basic/ -m 01_basic/manifests
You must specify the target image (with a tag).
If you run the script from the repo’s root directory, use the -w flag to point to the workflow directory, and specify the output directory with -m.
The command produces two artifacts:
- A workflow image:
quay.io/orchestrator/demo-basic:test(and tagged aslatest). - Kubernetes manifests under:
01_basic/manifests/
If you want, you can add the --push flag to automatically push the image after building.
(Otherwise, pushing manually is mandatory before deploying.)
Generated Workflow Manifests
Let’s look at what was generated under 01_basic/manifests:
01_basic/manifests
├── 00-secret_basic-secrets.yaml
├── 01-configmap_basic-props.yaml
├── 02-configmap_01-basic-resources-schemas.yaml
└── 03-sonataflow_basic.yaml
A quick overview:
00-secret_basic-secrets.yaml
Contains secrets from01_basic/src/main/resources/secret.properties.
Values are not required at this stage—you can set them later (after applying CRs or when using GitOps).
Important: In OpenShift Serverless Logic v1.35, after updating a secret, you must manually restart the workflow Pod for changes to apply. (v1.36 is not released yet.)01-configmap_basic-props.yaml
Holds application properties fromapplication.properties.
Any change to this ConfigMap triggers an automatic Pod restart.02-configmap_01-basic-resources-schemas.yaml
Contains JSON schemas fromsrc/main/resources/schemas.
Note: When using the GitOps profile, this ConfigMap (and similar ones likespecs) does not need to be deployed.03-sonataflow_basic.yaml
The SonataFlow custom resource (CR) that defines the workflow.
A few important parts:Image and Secrets Mounting:
podTemplate:
  container:
    image: quay.io/orchestrator/demo-basic
    resources: {}
    envFrom:
      - secretRef:
          name: basic-secrets
Persistence Configuration:
persistence:
  postgresql:
    secretRef:
      name: sonataflow-psql-postgresql
      userKey: postgres-username
      passwordKey: postgres-password
    serviceRef:
      name: sonataflow-psql-postgresql
      port: 5432
      databaseName: sonataflow
      databaseSchema: basic
If you need to connect to an external database, you must replace
serviceRefwith ajdbcUrl. See here.
By default, all the manifests are generated without a namespace. There is an option to specify a namespace to the script by the --namespace flag if we know the target namespace in advance. Otherwise, the namespace needs to be provided when applying the manifests to the cluster.
Find more about configuring workflows here.
🚀📦 Deploy Workflows on a Cluster
With the image pushed to the image registry and the manifests available, we can now deploy the workflow on a cluster.
Prerequisites
You need an OpenShift Container Platform (OCP) cluster with:
- Red Hat Developer Hub (RHDH) v1.5
- Orchestrator plugins v1.4 or v1.5
- OpenShift Serverless v1.35
- OpenShift Serverless Logic v1.35
Make sure you follow the installation instructions provided in the Orchestrator Documentation.
By default, OpenShift Serverless Logic services are installed in the sonataflow-infra namespace.
We must apply the workflow’s manifests in a namespace that contains a SonataflowPlatform custom resource, which manages the supporting services.
Deploy Workflow
kubectl create -n sonataflow-infra -f ./01_basic/manifests/.
Monitor Deployment
Check the status of the pods:
kubectl get pods -n sonataflow-infra -l app=basic
Initially, the pod may appear in an Error state because of missing or incomplete configuration in the Secret or ConfigMap.
Inspect the pod logs:
oc logs -n sonataflow-infra basic-f7c6ff455-vwl56
Example output:
SRCFG00040: The config property quarkus.openapi-generator.notifications.auth.BearerToken.bearer-token is defined as the empty String ("") which the following Converter considered to be null: io.smallrye.config.Converters$BuiltInConverter
java.lang.RuntimeException: Failed to start quarkus
...
Caused by: io.quarkus.runtime.configuration.ConfigurationException: Failed to read configuration properties
The error indicates a missing property: quarkus.openapi-generator.notifications.auth.BearerToken.bearer-token.
Inspect and Fix the ConfigMap
Retrieve the ConfigMap:
oc get -n sonataflow-infra configmaps basic-props -o yaml
Sample output:
apiVersion: v1
data:
  application.properties: |
    # Backstage Notifications service
    quarkus.rest-client.notifications.url=${BACKSTAGE_NOTIFICATIONS_URL}
    quarkus.openapi-generator.notifications.auth.BearerToken.bearer-token=${NOTIFICATIONS_BEARER_TOKEN}
...
The placeholders must be resolved using values provided via a Secret.
Edit the Secret
Edit the Secret and provide appropriate (even dummy) values:
kubectl edit secrets -n sonataflow-infra basic-secrets
Use base64-encoded dummy values if needed for this simple example. A restart of the workflow pod is required for the changes to take effect.
Verify Deployment Status
Check the pods again:
oc get pods -n sonataflow-infra -l app=basic
Expected output:
NAME                    READY   STATUS    RESTARTS   AGE
basic-f7c6ff455-grkxd   1/1     Running   0          47s
The pod should now be in the Running state.
With that, the workflow should now appear in the Orchestrator plugin inside Red Hat Developer Hub.
🛠️➡️ Next Steps
Now that the process of moving from a local development environment to the cluster is clear, the next logical step is designing a CI pipeline.
You can inspect the provided build script to extract the actual steps and implement them in your preferred CI/CD tool (e.g., GitHub Actions, GitLab CI, Jenkins, Tekton).
Creating Extracted OpenAPI Documents for Integrating Systems on Serverless Workflows
Creating Extracted OpenAPI Documents for Integrating Systems on Serverless Workflows
The blog post will guide developers on how to extract openAPI documents to a new file of manageable size. The need for this procedure has risen in account of restrictions that Quarkus imposes with accepting large YAML files as input (see appendix). This restriction directs us to be mindful and plan ahead which resources services we would need in our workflow.
Please note that there is a way to work around the input file size restriction, as will be demonstrated in the (appendix.)
In this guide, we will explain what is an OpenAPI Document, how to read and use the openAPI Specification, and eventually we will cover the steps to extract an openAPI document in a valid manner.
What is an OpenAPI Document?
A self-contained or composite resource which defines or describes an API or elements of an API.
OpenAPI documents are a standardized way to view a system’s exposed paths, resources and webhooks, and act as an alternative to using restAPI calls for interacting with other systems. An OpenAPI document uses and conforms to the OpenAPI Specification, and in itself is a JSON object (which may be represented either in JSON or YAML format).
For the OpenAPI Spec Documentation, see: https://swagger.io/specification/
How to make sense of an OpenAPI Document:
Let’s take a look at this openAPI document for some reference. This is an extracted version of a larger openAPI document
openapi: 3.0.3
info:
version: 1.1.4
title: GitHub v3 REST API
description: |-
|
GitHub's v3 REST API.
license:
name: MIT
url: https://spdx.org/licenses/MIT
termsOfService: https://docs.github.com/articles/github-terms-of-service
contact:
name: Support
url: https://support.github.com/contact?tags=dotcom-rest-api
x-github-plan: api.github.com
servers:
- url: https://api.github.com/
security:
- BearerToken: []
paths:
/repos/{owner}/{repo}/actions/workflows:
get:
summary: List repository workflows
description: |
Lists the workflows in a repository.
Anyone with read access to the repository can use this endpoint.
OAuth app tokens and personal access tokens (classic) need the `repo` scope
to use this endpoint with a private repository.
tags:
- actions
operationId: actions/list-repo-workflows
externalDocs:
description: API method documentation
url: https://docs.github.com/rest/actions/workflows#list-repository-workflows
parameters:
- $ref: "#/components/parameters/owner"
- $ref: "#/components/parameters/repo"
- $ref: "#/components/parameters/per-page"
- $ref: "#/components/parameters/page"
responses:
"200":
description: Response
content:
application/json:
schema:
type: object
required:
- total_count
- workflows
properties:
total_count:
type: integer
workflows:
type: array
items:
$ref: "#/components/schemas/workflow"
headers:
Link:
$ref: "#/components/headers/link"
x-github:
githubCloudOnly: false
enabledForGitHubApps: true
category: actions
subcategory: workflows
/repos/{owner}/{repo}/actions/workflows/{workflow_id}/runs:
get:
summary: List workflow runs for a workflow
description: |
"List all workflow runs for a workflow. You can replace `workflow_id`
with the workflow file name. For example, you could use `main.yaml`. You can
use parameters to narrow the list of results. For more information about using
parameters, see [Parameters](https://docs.github.com/rest/guides/getting-started-with-the-rest-api#parameters).
Anyone with read access to the repository can use this endpoint
OAuth app tokens and personal access tokens (classic) need the `repo` scope
to use this endpoint with a private repository."
tags:
- actions
operationId: actions/list-workflow-runs
externalDocs:
description: API method documentation
url: https://docs.github.com/rest/actions/workflow-runs#list-workflow-runs-for-a-workflow
parameters:
- $ref: "#/components/parameters/owner"
- $ref: "#/components/parameters/repo"
- $ref: "#/components/parameters/workflow-id"
- $ref: "#/components/parameters/actor"
- $ref: "#/components/parameters/workflow-run-branch"
- $ref: "#/components/parameters/event"
- $ref: "#/components/parameters/workflow-run-status"
- $ref: "#/components/parameters/per-page"
- $ref: "#/components/parameters/page"
- $ref: "#/components/parameters/created"
- $ref: "#/components/parameters/exclude-pull-requests"
- $ref: "#/components/parameters/workflow-run-check-suite-id"
- $ref: "#/components/parameters/workflow-run-head-sha"
responses:
"200":
description: Response
content:
application/json:
schema:
type: object
required:
- total_count
- workflow_runs
properties:
total_count:
type: integer
workflow_runs:
type: array
items:
$ref: "#/components/schemas/workflow-run"
headers:
Link:
$ref: "#/components/headers/link"
x-github:
githubCloudOnly: false
enabledForGitHubApps: true
category: actions
subcategory: workflow-runs
components:
schemas:
pull-request-minimal:
title: Pull Request Minimal
type: object
properties:
id:
type: integer
format: int64
number:
type: integer
url:
type: string
head:
type: object
properties:
ref:
type: string
sha:
type: string
repo:
type: object
properties:
id:
type: integer
format: int64
url:
type: string
name:
type: string
required:
- id
- url
- name
required:
- ref
- sha
- repo
base:
type: object
properties:
ref:
type: string
sha:
type: string
repo:
type: object
properties:
id:
type: integer
format: int64
url:
type: string
name:
type: string
required:
- id
- url
- name
required:
- ref
- sha
- repo
required:
- id
- number
- url
- head
- base
nullable-simple-commit:
title: Simple Commit
description: A commit.
type: object
properties:
id:
type: string
description: SHA for the commit
example: 7638417db6d59f3c431d3e1f261cc637155684cd
tree_id:
type: string
description: SHA for the commit's tree
message:
description: Message describing the purpose of the commit
example: "Fix #42"
type: string
timestamp:
description: Timestamp of the commit
example: "2014-08-09T08:02:04+12:00"
format: date-time
type: string
author:
type: object
description: Information about the Git author
properties:
name:
description: Name of the commit's author
example: Monalisa Octocat
type: string
email:
description: Git email address of the commit's author
example: monalisa.octocat@example.com
type: string
format: email
required:
- name
- email
nullable: true
committer:
type: object
description: Information about the Git committer
properties:
name:
description: Name of the commit's committer
example: Monalisa Octocat
type: string
email:
description: Git email address of the commit's committer
example: monalisa.octocat@example.com
type: string
format: email
required:
- name
- email
nullable: true
required:
- id
- tree_id
- message
- timestamp
- author
- committer
nullable: true
workflow:
title: Workflow
description: A GitHub Actions workflow
type: object
properties:
id:
type: integer
example: 5
node_id:
type: string
example: MDg6V29ya2Zsb3cxMg==
name:
type: string
example: CI
path:
type: string
example: ruby.yaml
state:
type: string
example: active
enum:
- active
- deleted
- disabled_fork
- disabled_inactivity
- disabled_manually
created_at:
type: string
format: date-time
example: "2019-12-06T14:20:20.000Z"
updated_at:
type: string
format: date-time
example: "2019-12-06T14:20:20.000Z"
url:
type: string
example: https://api.github.com/repos/actions/setup-ruby/workflows/5
html_url:
type: string
example: https://github.com/actions/setup-ruby/blob/master/.github/workflows/ruby.yaml
badge_url:
type: string
example: https://github.com/actions/setup-ruby/workflows/CI/badge.svg
deleted_at:
type: string
format: date-time
example: "2019-12-06T14:20:20.000Z"
required:
- id
- node_id
- name
- path
- state
- url
- html_url
- badge_url
- created_at
- updated_at
simple-user:
title: Simple User
description: A GitHub user.
type: object
properties:
name:
nullable: true
type: string
email:
nullable: true
type: string
login:
type: string
example: octocat
id:
type: integer
format: int64
example: 1
node_id:
type: string
example: MDQ6VXNlcjE=
avatar_url:
type: string
format: uri
example: https://github.com/images/error/octocat_happy.gif
gravatar_id:
type: string
example: 41d064eb2195891e12d0413f63227ea7
nullable: true
url:
type: string
format: uri
example: https://api.github.com/users/octocat
html_url:
type: string
format: uri
example: https://github.com/octocat
followers_url:
type: string
format: uri
example: https://api.github.com/users/octocat/followers
following_url:
type: string
example: https://api.github.com/users/octocat/following{/other_user}
gists_url:
type: string
example: https://api.github.com/users/octocat/gists{/gist_id}
starred_url:
type: string
example: https://api.github.com/users/octocat/starred{/owner}{/repo}
subscriptions_url:
type: string
format: uri
example: https://api.github.com/users/octocat/subscriptions
organizations_url:
type: string
format: uri
example: https://api.github.com/users/octocat/orgs
repos_url:
type: string
format: uri
example: https://api.github.com/users/octocat/repos
events_url:
type: string
example: https://api.github.com/users/octocat/events{/privacy}
received_events_url:
type: string
format: uri
example: https://api.github.com/users/octocat/received_events
type:
type: string
example: User
site_admin:
type: boolean
starred_at:
type: string
example: '"2020-07-09T00:17:55Z"'
required:
- avatar_url
- events_url
- followers_url
- following_url
- gists_url
- gravatar_id
- html_url
- id
- node_id
- login
- organizations_url
- received_events_url
- repos_url
- site_admin
- starred_url
- subscriptions_url
- type
- url
workflow-run:
title: Workflow Run
description: An invocation of a workflow
type: object
properties:
id:
type: integer
format: int64
description: The ID of the workflow run.
example: 5
name:
type: string
description: The name of the workflow run.
nullable: true
example: Build
node_id:
type: string
example: MDEwOkNoZWNrU3VpdGU1
check_suite_id:
type: integer
format: int64
description: The ID of the associated check suite.
example: 42
check_suite_node_id:
type: string
description: The node ID of the associated check suite.
example: MDEwOkNoZWNrU3VpdGU0Mg==
head_branch:
type: string
nullable: true
example: master
head_sha:
description: |
The SHA of the head commit that points to the version of the
workflow being run.
example: "009b8a3a9ccbb128af87f9b1c0f4c62e8a304f6d"
type: string
path:
description: The full path of the workflow
example: octocat/octo-repo/.github/workflows/ci.yml@main
type: string
run_number:
type: integer
description: The auto incrementing run number for the workflow run.
example: 106
run_attempt:
type: integer
description: |
Attempt number of the run, 1 for first attempt and higher if
the workflow was re-run.
example: 1
referenced_workflows:
type: array
nullable: true
items:
"$ref": "#/components/schemas/referenced-workflow"
event:
type: string
example: push
status:
type: string
nullable: true
example: completed
conclusion:
type: string
nullable: true
example: neutral
workflow_id:
type: integer
description: The ID of the parent workflow.
example: 5
url:
type: string
description: The URL to the workflow run.
example: https://api.github.com/repos/github/hello-world/actions/runs/5
html_url:
type: string
example: https://github.com/github/hello-world/suites/4
pull_requests:
description: Pull requests that are open with a `head_sha` or `head_branch` that matches the workflow run. The returned pull requests do not necessarily indicate pull requests that triggered the run.
type: array
nullable: true
items:
"$ref": "#/components/schemas/pull-request-minimal"
created_at:
type: string
format: date-time
updated_at:
type: string
format: date-time
actor:
"$ref": "#/components/schemas/simple-user"
triggering_actor:
"$ref": "#/components/schemas/simple-user"
run_started_at:
type: string
format: date-time
description: The start time of the latest run. Resets on re-run.
jobs_url:
description: The URL to the jobs for the workflow run.
type: string
example: https://api.github.com/repos/github/hello-world/actions/runs/5/jobs
logs_url:
description: The URL to download the logs for the workflow run.
type: string
example: https://api.github.com/repos/github/hello-world/actions/runs/5/logs
check_suite_url:
description: The URL to the associated check suite.
type: string
example: https://api.github.com/repos/github/hello-world/check-suites/12
artifacts_url:
description: The URL to the artifacts for the workflow run.
type: string
example: https://api.github.com/repos/github/hello-world/actions/runs/5/rerun/artifacts
cancel_url:
description: The URL to cancel the workflow run.
type: string
example: https://api.github.com/repos/github/hello-world/actions/runs/5/cancel
rerun_url:
description: The URL to rerun the workflow run.
type: string
example: https://api.github.com/repos/github/hello-world/actions/runs/5/rerun
previous_attempt_url:
nullable: true
description: The URL to the previous attempted run of this workflow, if one exists.
type: string
example: https://api.github.com/repos/github/hello-world/actions/runs/5/attempts/3
workflow_url:
description: The URL to the workflow.
type: string
example: https://api.github.com/repos/github/hello-world/actions/workflows/main.yaml
head_commit:
"$ref": "#/components/schemas/nullable-simple-commit"
repository:
"$ref": "#/components/schemas/minimal-repository"
head_repository:
"$ref": "#/components/schemas/minimal-repository"
head_repository_id:
type: integer
example: 5
display_title:
type: string
example: Simple Workflow
description: |
The event-specific title associated with the run or the run-name
if set, or the value of `run-name` if it is set in the workflow.
required:
- id
- node_id
- head_branch
- run_number
- display_title
- event
- status
- conclusion
- head_sha
- path
- workflow_id
- url
- html_url
- created_at
- updated_at
- head_commit
- head_repository
- repository
- jobs_url
- logs_url
- check_suite_url
- cancel_url
- rerun_url
- artifacts_url
- workflow_url
- pull_requests
referenced-workflow:
title: Referenced workflow
description: A workflow referenced/reused by the initial caller workflow
type: object
properties:
path:
type: string
sha:
type: string
ref:
type: string
required:
- path
- sha
minimal-repository:
title: Minimal Repository
description: Minimal Repository
type: object
properties:
id:
type: integer
format: int64
example: 1296269
node_id:
type: string
example: MDEwOlJlcG9zaXRvcnkxMjk2MjY5
name:
type: string
example: Hello-World
full_name:
type: string
example: octocat/Hello-World
owner:
"$ref": "#/components/schemas/simple-user"
private:
type: boolean
html_url:
type: string
format: uri
example: https://github.com/octocat/Hello-World
description:
type: string
example: This your first repo!
nullable: true
fork:
type: boolean
url:
type: string
format: uri
example: https://api.github.com/repos/octocat/Hello-World
archive_url:
type: string
example: http://api.github.com/repos/octocat/Hello-World/{archive_format}{/ref}
assignees_url:
type: string
example: http://api.github.com/repos/octocat/Hello-World/assignees{/user}
blobs_url:
type: string
example: http://api.github.com/repos/octocat/Hello-World/git/blobs{/sha}
branches_url:
type: string
example: http://api.github.com/repos/octocat/Hello-World/branches{/branch}
collaborators_url:
type: string
example: http://api.github.com/repos/octocat/Hello-World/collaborators{/collaborator}
comments_url:
type: string
example: http://api.github.com/repos/octocat/Hello-World/comments{/number}
commits_url:
type: string
example: http://api.github.com/repos/octocat/Hello-World/commits{/sha}
compare_url:
type: string
example: http://api.github.com/repos/octocat/Hello-World/compare/{base}...{head}
contents_url:
type: string
example: http://api.github.com/repos/octocat/Hello-World/contents/{+path}
contributors_url:
type: string
format: uri
example: http://api.github.com/repos/octocat/Hello-World/contributors
deployments_url:
type: string
format: uri
example: http://api.github.com/repos/octocat/Hello-World/deployments
downloads_url:
type: string
format: uri
example: http://api.github.com/repos/octocat/Hello-World/downloads
events_url:
type: string
format: uri
example: http://api.github.com/repos/octocat/Hello-World/events
forks_url:
type: string
format: uri
example: http://api.github.com/repos/octocat/Hello-World/forks
git_commits_url:
type: string
example: http://api.github.com/repos/octocat/Hello-World/git/commits{/sha}
git_refs_url:
type: string
example: http://api.github.com/repos/octocat/Hello-World/git/refs{/sha}
git_tags_url:
type: string
example: http://api.github.com/repos/octocat/Hello-World/git/tags{/sha}
git_url:
type: string
issue_comment_url:
type: string
example: http://api.github.com/repos/octocat/Hello-World/issues/comments{/number}
issue_events_url:
type: string
example: http://api.github.com/repos/octocat/Hello-World/issues/events{/number}
issues_url:
type: string
example: http://api.github.com/repos/octocat/Hello-World/issues{/number}
keys_url:
type: string
example: http://api.github.com/repos/octocat/Hello-World/keys{/key_id}
labels_url:
type: string
example: http://api.github.com/repos/octocat/Hello-World/labels{/name}
languages_url:
type: string
format: uri
example: http://api.github.com/repos/octocat/Hello-World/languages
merges_url:
type: string
format: uri
example: http://api.github.com/repos/octocat/Hello-World/merges
milestones_url:
type: string
example: http://api.github.com/repos/octocat/Hello-World/milestones{/number}
notifications_url:
type: string
example: http://api.github.com/repos/octocat/Hello-World/notifications{?since,all,participating}
pulls_url:
type: string
example: http://api.github.com/repos/octocat/Hello-World/pulls{/number}
releases_url:
type: string
example: http://api.github.com/repos/octocat/Hello-World/releases{/id}
ssh_url:
type: string
stargazers_url:
type: string
format: uri
example: http://api.github.com/repos/octocat/Hello-World/stargazers
statuses_url:
type: string
example: http://api.github.com/repos/octocat/Hello-World/statuses/{sha}
subscribers_url:
type: string
format: uri
example: http://api.github.com/repos/octocat/Hello-World/subscribers
subscription_url:
type: string
format: uri
example: http://api.github.com/repos/octocat/Hello-World/subscription
tags_url:
type: string
format: uri
example: http://api.github.com/repos/octocat/Hello-World/tags
teams_url:
type: string
format: uri
example: http://api.github.com/repos/octocat/Hello-World/teams
trees_url:
type: string
example: http://api.github.com/repos/octocat/Hello-World/git/trees{/sha}
clone_url:
type: string
mirror_url:
type: string
nullable: true
hooks_url:
type: string
format: uri
example: http://api.github.com/repos/octocat/Hello-World/hooks
svn_url:
type: string
homepage:
type: string
nullable: true
language:
type: string
nullable: true
forks_count:
type: integer
stargazers_count:
type: integer
watchers_count:
type: integer
size:
description: The size of the repository, in kilobytes. Size is calculated hourly. When a repository is initially created, the size is 0.
type: integer
default_branch:
type: string
open_issues_count:
type: integer
is_template:
type: boolean
topics:
type: array
items:
type: string
has_issues:
type: boolean
has_projects:
type: boolean
has_wiki:
type: boolean
has_pages:
type: boolean
has_downloads:
type: boolean
has_discussions:
type: boolean
archived:
type: boolean
disabled:
type: boolean
visibility:
type: string
pushed_at:
type: string
format: date-time
example: "2011-01-26T19:06:43Z"
nullable: true
created_at:
type: string
format: date-time
example: "2011-01-26T19:01:12Z"
nullable: true
updated_at:
type: string
format: date-time
example: "2011-01-26T19:14:43Z"
nullable: true
permissions:
type: object
properties:
admin:
type: boolean
maintain:
type: boolean
push:
type: boolean
triage:
type: boolean
pull:
type: boolean
role_name:
type: string
example: admin
temp_clone_token:
type: string
delete_branch_on_merge:
type: boolean
subscribers_count:
type: integer
network_count:
type: integer
code_of_conduct:
"$ref": "#/components/schemas/code-of-conduct"
license:
type: object
properties:
key:
type: string
name:
type: string
spdx_id:
type: string
url:
type: string
node_id:
type: string
nullable: true
forks:
type: integer
example: 0
open_issues:
type: integer
example: 0
watchers:
type: integer
example: 0
allow_forking:
type: boolean
web_commit_signoff_required:
type: boolean
example: false
security_and_analysis:
"$ref": "#/components/schemas/security-and-analysis"
required:
- archive_url
- assignees_url
- blobs_url
- branches_url
- collaborators_url
- comments_url
- commits_url
- compare_url
- contents_url
- contributors_url
- deployments_url
- description
- downloads_url
- events_url
- fork
- forks_url
- full_name
- git_commits_url
- git_refs_url
- git_tags_url
- hooks_url
- html_url
- id
- node_id
- issue_comment_url
- issue_events_url
- issues_url
- keys_url
- labels_url
- languages_url
- merges_url
- milestones_url
- name
- notifications_url
- owner
- private
- pulls_url
- releases_url
- stargazers_url
- statuses_url
- subscribers_url
- subscription_url
- tags_url
- teams_url
- trees_url
- url
security-and-analysis:
nullable: true
type: object
properties:
advanced_security:
type: object
properties:
status:
type: string
enum:
- enabled
- disabled
dependabot_security_updates:
description: Enable or disable Dependabot security updates for the repository.
type: object
properties:
status:
description: The enablement status of Dependabot security updates for the repository.
type: string
enum:
- enabled
- disabled
secret_scanning:
type: object
properties:
status:
type: string
enum:
- enabled
- disabled
secret_scanning_push_protection:
type: object
properties:
status:
type: string
enum:
- enabled
- disabled
secret_scanning_non_provider_patterns:
type: object
properties:
status:
type: string
enum:
- enabled
- disabled
code-of-conduct:
title: Code Of Conduct
description: Code Of Conduct
type: object
properties:
key:
type: string
example: contributor_covenant
name:
type: string
example: Contributor Covenant
url:
type: string
format: uri
example: https://api.github.com/codes_of_conduct/contributor_covenant
body:
type: string
example: |
# Contributor Covenant Code of Conduct
## Our Pledge
In the interest of fostering an open and welcoming environment, we as contributors and maintainers pledge to making participation in our project and our community a harassment-free experience for everyone, regardless of age, body size, disability, ethnicity, gender identity and expression, level of experience, nationality, personal appearance, race, religion, or sexual identity and orientation.
## Our Standards
Examples of behavior that contributes to creating a positive environment include:
* Using welcoming and inclusive language
* Being respectful of differing viewpoints and experiences
* Gracefully accepting constructive criticism
* Focusing on what is best for the community
* Showing empathy towards other community members
Examples of unacceptable behavior by participants include:
* The use of sexualized language or imagery and unwelcome sexual attention or advances
* Trolling, insulting/derogatory comments, and personal or political attacks
* Public or private harassment
* Publishing others' private information, such as a physical or electronic address, without explicit permission
* Other conduct which could reasonably be considered inappropriate in a professional setting
## Our Responsibilities
Project maintainers are responsible for clarifying the standards of acceptable behavior and are expected to take appropriate and fair corrective action in response
to any instances of unacceptable behavior.
Project maintainers have the right and responsibility to remove, edit, or reject comments, commits, code, wiki edits, issues, and other contributions that are not aligned to this Code of Conduct, or to ban temporarily or permanently any contributor for other behaviors that they deem inappropriate, threatening, offensive, or harmful.
## Scope
This Code of Conduct applies both within project spaces and in public spaces when an individual is representing the project or its community. Examples of representing a project or community include using an official project e-mail address,
posting via an official social media account, or acting as an appointed representative at an online or offline event. Representation of a project may be further defined and clarified by project maintainers.
## Enforcement
Instances of abusive, harassing, or otherwise unacceptable behavior may be reported by contacting the project team at [EMAIL]. The project team will review and investigate all complaints, and will respond in a way that it deems appropriate to the circumstances. The project team is obligated to maintain confidentiality with regard to the reporter of an incident. Further details of specific enforcement policies may be posted separately.
Project maintainers who do not follow or enforce the Code of Conduct in good faith may face temporary or permanent repercussions as determined by other members of the project's leadership.
## Attribution
This Code of Conduct is adapted from the [Contributor Covenant](http://contributor-covenant.org), version 1.4, available at [http://contributor-covenant.org/version/1/4](http://contributor-covenant.org/version/1/4/).
html_url:
type: string
format: uri
nullable: true
required:
- url
- html_url
- key
- name
parameters:
owner:
name: owner
description: The account owner of the repository. The name is not case sensitive.
in: path
required: true
schema:
type: string
repo:
name: repo
description: The name of the repository without the `.git` extension. The name is not case sensitive.
in: path
required: true
schema:
type: string
per-page:
name: per_page
description: The number of results per page (max 100). For more information, see "[Using pagination in the REST API](https://docs.github.com/rest/using-the-rest-api/using-pagination-in-the-rest-api)."
in: query
schema:
type: integer
default: 30
page:
name: page
description: The page number of the results to fetch. For more information, see "[Using pagination in the REST API](https://docs.github.com/rest/using-the-rest-api/using-pagination-in-the-rest-api)."
in: query
schema:
type: integer
default: 1
workflow-id:
name: workflow_id
in: path
description: The ID of the workflow.
required: true
schema:
type: integer
actor:
name: actor
description: Returns someone's workflow runs. Use the login for the user who created the `push` associated with the check suite or workflow run.
in: query
required: false
schema:
type: string
workflow-run-branch:
name: branch
description: Returns workflow runs associated with a branch. Use the name of the branch of the `push`.
in: query
required: false
schema:
type: string
event:
name: event
description: Returns workflow run triggered by the event you specify. For example, `push`, `pull_request` or `issue`. For more information, see "[Events that trigger workflows](https://docs.github.com/actions/automating-your-workflow-with-github-actions/events-that-trigger-workflows)."
in: query
required: false
schema:
type: string
workflow-run-status:
name: status
description: Returns workflow runs with the check run `status` or `conclusion` that you specify. For example, a conclusion can be `success` or a status can be `in_progress`. Only GitHub Actions can set a status of `waiting`, `pending`, or `requested`.
in: query
required: false
schema:
type: string
enum:
- completed
- action_required
- cancelled
- failure
- neutral
- skipped
- stale
- success
- timed_out
- in_progress
- queued
- requested
- waiting
- pending
created:
name: created
description: Returns workflow runs created within the given date-time range. For more information on the syntax, see "[Understanding the search syntax](https://docs.github.com/search-github/getting-started-with-searching-on-github/understanding-the-search-syntax#query-for-dates)."
in: query
required: false
schema:
type: string
format: date-time
exclude-pull-requests:
name: exclude_pull_requests
description: If `true` pull requests are omitted from the response (empty array).
in: query
required: false
schema:
type: boolean
default: false
workflow-run-check-suite-id:
name: check_suite_id
description: Returns workflow runs with the `check_suite_id` that you specify.
in: query
schema:
type: integer
format: int64
workflow-run-head-sha:
name: head_sha
description: Only returns workflow runs that are associated with the specified `head_sha`.
in: query
required: false
schema:
type: string
headers:
link:
example: ; rel="next", ; rel="last"
schema:
type: string
content-type:
example: text/html
schema:
type: string
x-common-marker-version:
example: 0.17.4
schema:
type: string
x-rate-limit-limit:
example: 5000
schema:
type: integer
x-rate-limit-remaining:
example: 4999
schema:
type: integer
x-rate-limit-reset:
example: 1590701888
schema:
type: integer
format: timestamp
location:
example: https://pipelines.actions.githubusercontent.com/OhgS4QRKqmgx7bKC27GKU83jnQjyeqG8oIMTge8eqtheppcmw8/_apis/pipelines/1/runs/176/signedlogcontent?urlExpires=2020-01-24T18%3A10%3A31.5729946Z&urlSigningMethod=HMACV1&urlSignature=agG73JakPYkHrh06seAkvmH7rBR4Ji4c2%2B6a2ejYh3E%3D
schema:
type: string
securitySchemes:
BearerToken:
type: http
scheme: bearer
The JSON object hierarchy can be described in the following diagram:
openapi
info
├── title
└── version
servers
security
paths
├── path_1
└── path_2
components
├── schemas
│   ├── shema_1
│   └── schema_2
├── securitySchemas
├── parameters
└── headers
The document begins by specifying the openAPI version, an info object, and specifying the servers.
openapi: 3.0.3
info:
  version: 1.1.4
  title: GitHub v3 REST API
  description: |-
    |
    GitHub's v3 REST API.
  license:
    name: MIT
    url: https://spdx.org/licenses/MIT
  termsOfService: https://docs.github.com/articles/github-terms-of-service
  contact:
    name: Support
    url: https://support.github.com/contact?tags=dotcom-rest-api
  x-github-plan: api.github.com
servers:
  - url: https://api.github.com/
security:
  - BearerToken: []
The document will then display the system’s paths, and must include at least one path. Under each path, the document specifies the path URI, an HTTP method, parameters (if needed), the requestBody, and defines the responses. Note that both the request and the responses can reference a component from a different part of the document. This will be important when we try to extract the document to our needed purposes.
Moreover, it’s good to notice now that references to components from some paths may trigger more refernces, as some components reference other components within themselves.
An example for a path structure can be seen here:
paths:
  /repos/{owner}/{repo}/actions/workflows/{workflow_id}/runs:
      get:
        summary: List workflow runs for a workflow
        description: |
          "List all workflow runs for a workflow. You can replace `workflow_id`
          with the workflow file name. For example, you could use `main.yaml`. You can
          use parameters to narrow the list of results. For more information about using
          parameters, see [Parameters](https://docs.github.com/rest/guides/getting-started-with-the-rest-api#parameters).
          Anyone with read access to the repository can use this endpoint
          OAuth app tokens and personal access tokens (classic) need the `repo` scope
          to use this endpoint with a private repository."
        tags:
          - actions
        operationId: actions/list-workflow-runs
        externalDocs:
          description: API method documentation
          url: https://docs.github.com/rest/actions/workflow-runs#list-workflow-runs-for-a-workflow
        parameters:
          - $ref: "#/components/parameters/owner"
          - $ref: "#/components/parameters/repo"
          - $ref: "#/components/parameters/workflow-id"
          - $ref: "#/components/parameters/actor"
          - $ref: "#/components/parameters/workflow-run-branch"
          - $ref: "#/components/parameters/event"
          - $ref: "#/components/parameters/workflow-run-status"
          - $ref: "#/components/parameters/per-page"
          - $ref: "#/components/parameters/page"
          - $ref: "#/components/parameters/created"
          - $ref: "#/components/parameters/exclude-pull-requests"
          - $ref: "#/components/parameters/workflow-run-check-suite-id"
          - $ref: "#/components/parameters/workflow-run-head-sha"
        responses:
          "200":
            description: Response
            content:
              application/json:
                schema:
                  type: object
                  required:
                    - total_count
                    - workflow_runs
                  properties:
                    total_count:
                      type: integer
                    workflow_runs:
                      type: array
                      items:
                        $ref: "#/components/schemas/workflow-run"
            headers:
              Link:
                $ref: "#/components/headers/link"
        x-github:
          githubCloudOnly: false
          enabledForGitHubApps: true
          category: actions
          subcategory: workflow-runs
Lastly, The document specifies the components it uses in its paths. A component can be a schema for any resource, some parameter specification object, HTTP headers and more. To get a better understanding, see some openAPI official examples. As mentioned before, some components can also reference other components. Let’s take a look in the ‘workflow-run’ component.
  workflow-run:
    title: Workflow Run
    description: An invocation of a workflow
    type: object
    properties:
      id:
        type: integer
        format: int64
        description: The ID of the workflow run.
        example: 5
      name:
        type: string
        description: The name of the workflow run.
        nullable: true
        example: Build
      node_id:
        type: string
        example: MDEwOkNoZWNrU3VpdGU1
      check_suite_id:
        type: integer
        format: int64
        description: The ID of the associated check suite.
        example: 42
      check_suite_node_id:
        type: string
        description: The node ID of the associated check suite.
        example: MDEwOkNoZWNrU3VpdGU0Mg==
      head_branch:
        type: string
        nullable: true
        example: master
      head_sha:
        description: |
          The SHA of the head commit that points to the version of the
          workflow being run.
        example: "009b8a3a9ccbb128af87f9b1c0f4c62e8a304f6d"
        type: string
      path:
        description: The full path of the workflow
        example: octocat/octo-repo/.github/workflows/ci.yml@main
        type: string
      run_number:
        type: integer
        description: The auto incrementing run number for the workflow run.
        example: 106
      run_attempt:
        type: integer
        description: |
          Attempt number of the run, 1 for first attempt and higher if
          the workflow was re-run.
        example: 1
      referenced_workflows:
        type: array
        nullable: true
        items:
          "$ref": "#/components/schemas/referenced-workflow"
      event:
        type: string
        example: push
      status:
        type: string
        nullable: true
        example: completed
      conclusion:
        type: string
        nullable: true
        example: neutral
      workflow_id:
        type: integer
        description: The ID of the parent workflow.
        example: 5
      url:
        type: string
        description: The URL to the workflow run.
        example: https://api.github.com/repos/github/hello-world/actions/runs/5
      html_url:
        type: string
        example: https://github.com/github/hello-world/suites/4
      pull_requests:
        description: Pull requests that are open with a `head_sha` or `head_branch` that matches the workflow run. The returned pull requests do not necessarily indicate pull requests that triggered the run.
        type: array
        nullable: true
        items:
          "$ref": "#/components/schemas/pull-request-minimal"
      created_at:
        type: string
        format: date-time
      updated_at:
        type: string
        format: date-time
      actor:
        "$ref": "#/components/schemas/simple-user"
      triggering_actor:
        "$ref": "#/components/schemas/simple-user"
      run_started_at:
        type: string
        format: date-time
        description: The start time of the latest run. Resets on re-run.
      jobs_url:
        description: The URL to the jobs for the workflow run.
        type: string
        example: https://api.github.com/repos/github/hello-world/actions/runs/5/jobs
      logs_url:
        description: The URL to download the logs for the workflow run.
        type: string
        example: https://api.github.com/repos/github/hello-world/actions/runs/5/logs
      check_suite_url:
        description: The URL to the associated check suite.
        type: string
        example: https://api.github.com/repos/github/hello-world/check-suites/12
      artifacts_url:
        description: The URL to the artifacts for the workflow run.
        type: string
        example: https://api.github.com/repos/github/hello-world/actions/runs/5/rerun/artifacts
      cancel_url:
        description: The URL to cancel the workflow run.
        type: string
        example: https://api.github.com/repos/github/hello-world/actions/runs/5/cancel
      rerun_url:
        description: The URL to rerun the workflow run.
        type: string
        example: https://api.github.com/repos/github/hello-world/actions/runs/5/rerun
      previous_attempt_url:
        nullable: true
        description: The URL to the previous attempted run of this workflow, if one exists.
        type: string
        example: https://api.github.com/repos/github/hello-world/actions/runs/5/attempts/3
      workflow_url:
        description: The URL to the workflow.
        type: string
        example: https://api.github.com/repos/github/hello-world/actions/workflows/main.yaml
      head_commit:
        "$ref": "#/components/schemas/nullable-simple-commit"
      repository:
        "$ref": "#/components/schemas/minimal-repository"
      head_repository:
        "$ref": "#/components/schemas/minimal-repository"
      head_repository_id:
        type: integer
        example: 5
      display_title:
        type: string
        example: Simple Workflow
        description: |
          The event-specific title associated with the run or the run-name
          if set, or the value of `run-name` if it is set in the workflow.
    required:
      - id
      - node_id
      - head_branch
      - run_number
      - display_title
      - event
      - status
      - conclusion
      - head_sha
      - path
      - workflow_id
      - url
      - html_url
      - created_at
      - updated_at
      - head_commit
      - head_repository
      - repository
      - jobs_url
      - logs_url
      - check_suite_url
      - cancel_url
      - rerun_url
      - artifacts_url
      - workflow_url
      - pull_requests
As we can see, the ‘workflow-run’ component is referencing other schemas in the document. This becomes important if you wish to extract an openAPI document to a smaller size, as you would need to track all recursive references and include all components that got mentioned in the way.
Note the securitySchemas object, which specifies the authentication method used:
securitySchemes:
   BearerToken:
     type: http
     scheme: bearer
How to extract an OpenAPI Document to workable size?
Manual and logical approach
Let’s say we have an outline of a serverless workflow, and a very large openAPI document that exposes many system resources, much more than we intend on using.
The procedure for extracting the openAPI document can be logically described as the following:
- Copy any ‘openapi’, ‘info’, ‘security’, ‘servers’ objects to the new document.
- Identify all system resources that are needed for the workflow.
- For each resource, locate the path object that returns the needed resource.
- For each path, create a dependency tree of all components referenced by the path, and of all components referenced by those components, recursively.
- Include the securitySchema of the original ‘components’ object.
- Include any webhooks the application may need.
This procedure can be quite tedious when done manually, so some efforts were made to automate the process.
Python script to extract documents
The following script can be used to extract reduced openAPI documents from larger ones. The script takes an input file, and output file, and a list of tuples (path objects, http method).
python extract.py openapi_spec.json filtered_openapi_spec.json \
"/apis/apps/v1/namespaces/{namespace}/deployments post" \
"/apis/apps/v1/namespaces/{namespace}/deployments/{name} get" \
"/api/v1/namespaces/{namespace}/services post" \
"/apis/route.openshift.io/v1/namespaces/{namespace}/routes post" \
"/apis/route.openshift.io/v1/namespaces/{namespace}/routes/{name} get" \
"/apis/route.openshift.io/v1/namespaces/{namespace}/routes/{name}/status get"
For each path, it extracts all dependencies (refs) that come with it in a recursive way.
- Note that currently some references may be missed by the script.
- The script accepts a JSON file type as input.
Some upcoming efforts will look into integrating this logic natively in the kn-workflow CLI.
Use kn-workflow version greater than 1.35
kn-workflow introduces a new feature to minify the OpenAPI spec file to the used paths and components:
kn-workflow specs minify --help

	Minification of OpenAPI specs:
	Minification allows us to reduce the size of an OpenAPI spec file, which is essential given the maximum YAML
	size supported by Kubernetes is limited to 3,145,728 bytes.

	Note: right now only OpenAPI specs are supported for minification, see examples below.


Usage:
  kn workflow specs minify [command]

Examples:

	#Minify the workflow project's OpenAPI spec file located in the current project.
	kn workflow specs minify openapi


Available Commands:
  openapi     Minify the openAPI spec files to trim operations only used by the workflows

Flags:
  -h, --help   help for minify

Use "kn workflow specs minify [command] --help" for more information about a command.
Best Practices and Warnings:
Document size: Even though the Quarkus engine has a YAML input file size limit of 3MB, the kn-workflow CLI generates k8s resources (configmaps) for spec/schema files.
K8s has a default size limit of ~1MB per resource, and by default they get applied to all as part of the helm charts created.
Therefore, it is best practice to keep the extracted openAPI documents to under 1MB, until this practice is changed.
Appendix:
Input file size restriction errors:
Quarkus uses snakeYAML to process the input YAML files in a serverless workflow. A default setting of a maximum size limit has been put in place, which inhibits accepting large files.
Caused by: org.yaml.snakeyaml.error.YAMLException: The incoming YAML document exceeds the limit: 3145728 code points.
[...]
[ERROR] Error parsing content
com.fasterxml.jackson.dataformat.yaml.JacksonYAMLParseException: The incoming YAML document exceeds the limit: 3145728 code points.
 at [Source: (StringReader); line: 82506, column: 15]
For reference, a reproducer was creater for this issue.
Size restriction workaround:
By passing the following parameter to the Java build environment, it is possible to set the maximum YAML input file size limit.
-DmaxYamlCodePoints=99999999
The CodePoints parameter refers to Unicode points, which are essentially the number of characters in the input file (for UTF-8 encoding) The maximum code point number is the integer max, 2^31-1.
Production Mode vs. Dev Mode
When setting up workflow orchestration, it’s crucial to understand the differences between production mode and development (dev) mode, particularly in terms of infrastructure requirements. This distinction ensures that workflows are efficiently managed and executed based on their intended use case. Here, we’ll explore these differences, focusing on the infrastructure required to run workflows in each mode.
Production Mode
Production mode is tailored for environments where stability, reliability, and scalability are paramount. The Orchestrator Helm chart or Orchestrator operator is designed specifically to meet the demanding requirements of production environments. Key requirements include:
- Long-running Workflows: Production mode supports workflows that may take several hours or even days to complete, ensuring that these processes run smoothly without interruption.
- Persistence of Running Workflow Instances: Ensuring the persistence of workflow instances is critical. In production, all workflow data is stored and maintained even if the orchestrator restarts, preventing data loss.
- Event Handling Reliability: Reliable handling of events is essential for maintaining workflow integrity and ensuring that all triggers and actions occur as expected.
- Scalability: The system must be capable of scaling up to handle increasing workloads, allowing for the addition of resources as demand grows.
- Updates Through Pipelines: Workflows can be updated and managed through continuous integration/continuous deployment (CI/CD) pipelines, facilitating smooth and efficient updates.
- Externalizing Credentials: Credentials are managed outside the workflow configuration to enhance security and simplify updates.
- Runtime Isolation: Each workflow runs in its isolated environment, preventing any interference between workflows.
- Authorization and Administration: Robust mechanisms are in place for authorizing and administering workflow deployments, ensuring that only authorized personnel can make changes.
Development (Dev) Mode
Dev mode, as the name implies, is optimized for development purposes. It allows developers to experiment with the Orchestrator plugins without the need for a full deployment process or access to a Kubernetes (K8s) or OpenShift (OCP) cluster. Characteristics of dev mode include:
- Ephemeral Workflows: Workflows run in an ephemeral mode, meaning that they are temporary and do not persist after the container restarts. This is suitable for development and testing.
- No Persistence: In dev mode, there is no persistence for running workflow instances. All instance information is lost after a container restart, making it ideal for short-running or non-critical workflows.
- Development Focus: Dev mode is designed for developers to gain experience and test workflows without the overhead of a full production environment.
- Hot-deployment of Workflows: Developers can deploy new workflows by simply placing the workflow files in a designated folder, enabling rapid iteration and testing.
- Simpler Deployment Model: A single container serves all workflows, simplifying the deployment process and reducing the need for extensive infrastructure setup.
- Acceptable Data Loss: For short-running workflows or development scenarios, the occasional loss of workflow instance tracking is acceptable.
Summary
Understanding the infrastructure requirements for production and dev modes is essential for effective workflow orchestration. Production mode ensures reliability, scalability, and persistence, making it suitable for critical, long-running workflows. Dev mode, on the other hand, provides a lightweight, flexible environment for development and testing, where temporary workflows and occasional data loss are acceptable. By selecting the appropriate mode based on the use case, organizations can optimize their workflow management processes.
Serverless Workflows: an Automated Developer Experience
Great job on installing the Orchestrator plugin and the SonataFlow operator! But what comes next?
If you aim to understand the full development lifecycle of serverless workflows, from zero to production, then you’ve come to the right place.
Thanks to the Orchestrator functions and automations, developers can now focus solely on building their applications without being burdened by unnecessary cognitive load. Let’s delve into how to effectively manage the end-to-end software development lifecycle of serverless workflows, leveraging these built-in capabilities.
A Reference Architecture for Automated Deployments of Serverless Workflows
The reference architecture that we’re going to describe consists of the following components:
Orchestrator Helm chart: the installer of RHDH Orchestrator .Red Hat Developer Hub (RHDH): the Red Hat product for Backstage.Tekton/Red Hat OpenShift Pipelines: the Kubernetes-Native CI pipeline to build images and deployment configurations.ArgoCD/Red Hat OpenShift GitOps: the CD pipeline to deploy the workflow on the RHDH instance.Quay.io: the container registry service to store the software images.SonataFlow platform: the SonataFlow implementation of the Serverless Workflow specifications, including a Kubernetes operator and the platform services (data index, jobs service).SonataFlow: the custom resource representing the workflow.GitHub workflow repo: the source code repository of the workflow.GitHub gitops repo: the repository of thekustomizedeployment configuration.- Includes the commands to boostrap the ArgoCD applications on your selected environment.
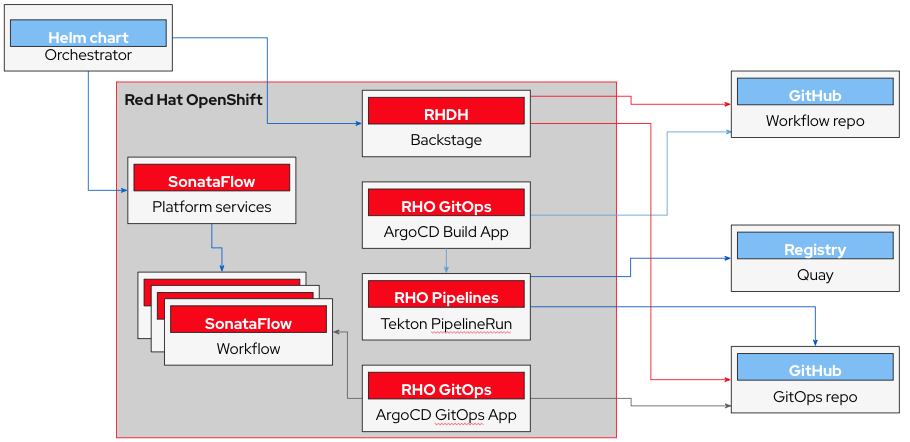
Please note that all these components, with the exclusion of the Quay.io and the GitHub organizations, are either bundled with the Orchestrator plugin or managed by the software projects generated with the RHDH Software Templates.
Software Development with Git
Let’s assume your company follows the feature branches git workflow:
- Developers work on individual
featurebranches. - The
developbranch serves as the integration point where all features are merged to validate the application in the staging environment. - Once the software receives the green light, the code is released to the
mainbranch and deployed to the production environment.

Don’t be surprised, but the Orchestrator plugin automatically installs all the needed resources to handle these steps for you throughout the entire software development lifecycle.
The Software Development Lifecycle
Creating the Software Project
RHDH offers the software template functionality to create the foundational structure of software projects adhering to industry best practices in software development and deployment.
The Orchestrator plugin comes with its own templates designed to kickstart your workflow project. By selecting a template tagged with orchestrator, you gain access to the following benefits, all at no cost:
- A fully operational software project to develop your serverless workflow, in a newly generated Git repository under the organization of your choice.
- A ready-to-use configuration repository with a kustomize configuration to deploy the workflow on the designated RHDH instance.
- (*) Automated CI tool deployment to build workflows on the selected cluster.
- (*) Automated CD automation deployment to deploy applications implementing your workflow.
(*): optional but highly recommended!
Sounds great, isn’t it?
Developing the Serverless Workflow
This topic will be soon expanded in a dedicated post. However, we’d like to at least provide a list of a few amazing tools that you can use in this stage:
- VSCode editor and the VS Code extension for Serverless Workflow editor
- Quarkus
- Swagger
- SonataFlow extension in Quarkus Dev UI
Using these toolkits and platforms, you can develop and test(*) your applicationn either on your local machine or as a containerized image, before moving to the next step.
(*): both unit and integration tests are supported
Testing the Staging Environment
And here comes the magic of automation.
Whenever a feature is merged in the staging branch, the CI/CD pipelines are triggered to build the container image, update the deployment configuration and deploy them to the staging instance of RHDH. You don’t have to do anything for this – the installed automation tools will handle the process for you.
That was a brief section, wasn’t it? This way, you can save reading time and focus on validating the workflow application in the staging environment.
Ready for Production
Get ready for another quick section.
Once the software has been validated and released, the CI/CD pipelines are triggered again to build and deploy the application in the production environment. Easy-peasy, and once again, making efficient use of the developer’s time.
Wrapping Up
What are you waiting for then? Design your first workflow and let the Orchestrator handle the tedious tasks for you.
Get customer-ready in just a minute with the power of the Automated Developer Experience for RHDH Orchestrator!
Serverless Workflows: an Automated Developer Experience Step-by-Step
In this blog, we’ll guide you through the journey from a software template to bootstrapping the workflow development, building, packaging, releasing, and deploying it on a cluster. If you need a high-level explanation or want to dive into the architecture of the solution, check out our previous blog. You can also watch a detailed demonstration of the content covered in this post in this recording.
Prerequisites and Assumptions
This blog assumes familiarity with specific tools, technologies, and methodologies. We’ll start with RHDH (Backstage) by launching a basic workflow template, working with GitHub for source control, pushing the workflow image to Quay, and using Kustomize to deploy the ArgoCD application for GitOps.
- The target Quay repository for the workflow’s image should exist.
- The target namespace for both the pipeline and the workflow is set to
sonataflow-infraand not configurable.
Creating a Workflow Repository
Let’s begin by creating a workflow named demo under the Quay organization orchestrator-testing. We’ll use the repository orchestrator-testing/serverless-workflow-demo to store the workflow image.
Setting Robot Account Permissions
Next, add robot account permissions to the created repository.
Creating a Secret for GitOps Cluster
Refer to the instructions here for creating and configuring the secret for the target cluster.
Creating the Software Template
The Orchestrator plugin provides templates to kickstart your workflow project. By selecting a template tagged with orchestrator, you gain access to the following benefits:
- A fully operational software project in a new Git repository under your chosen organization.
- A configuration repository with
kustomizeconfigurations for deploying the workflow on RHDH. - Automated CI tool deployment using OpenShift Pipelines.
- Automated CD deployment for applications using OpenShift GitOps.
Selecting and Launching the Template
Navigate to the Catalog and select the Basic workflow bootstrap project template. Click “Launch Template” to start filling in the input parameters for creating the workflow and its GitOps projects.
Input Parameters Overview
Review the parameters required for workflow creation, including organization name, repository name, workflow ID, workflow type, CI/CD method, namespaces, Quay details, persistence option, and database properties.
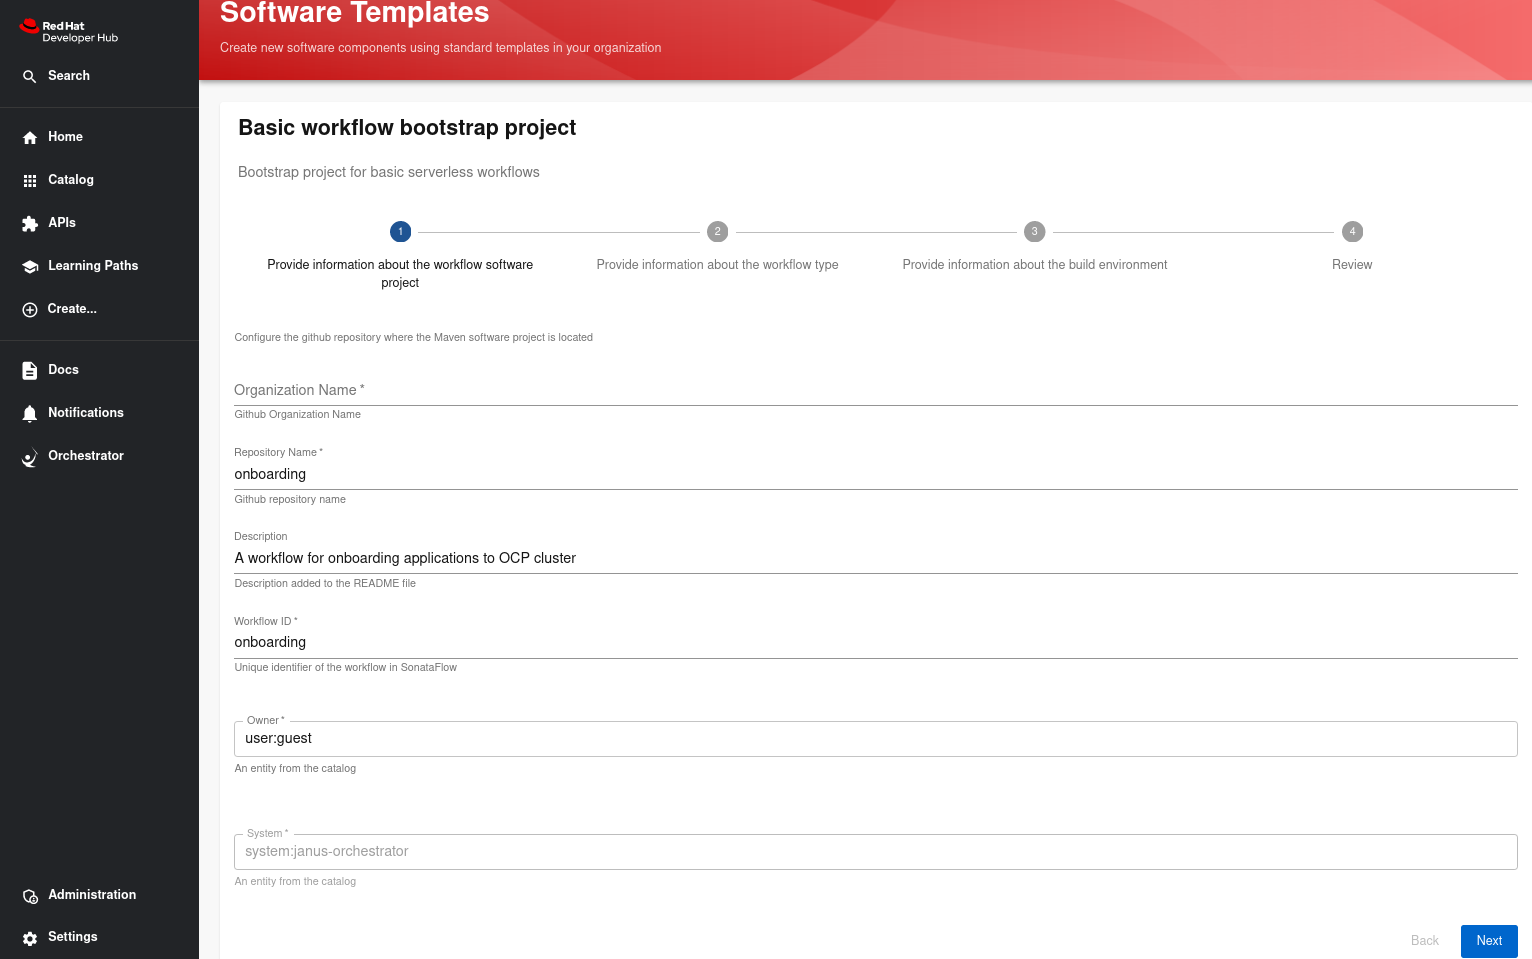
This section provides an overview of the parameters required for workflow creation:
- Organization Name - The GitHub organization where workflow repositories will be created. Ensure that the GitHub token provided during Orchestrator chart installation includes repository creation permissions in this organization.
- Repository Name - The name of the repository containing the workflow definition, spec and schema files, and application properties. Workflow development occurs in this repository. For example, if this repository is named onboarding, a second repository named onboarding-gitops is created for CD automated deployment of the workflow.
- Description - This description will be added to the README.md file of the generated project and the workflow definition shown in the Orchestrator plugin.
- Workflow ID - A unique identifier for the workflow. This ID is used to generate project resources (appearing in file names) and acts as the name of the Sonataflow CR for that workflow. After deploying the CR to the cluster, the ID identifies the workflow in Sonataflow.
On the second screen, you’ll need to select the workflow type. You can learn more about different workflow types here.
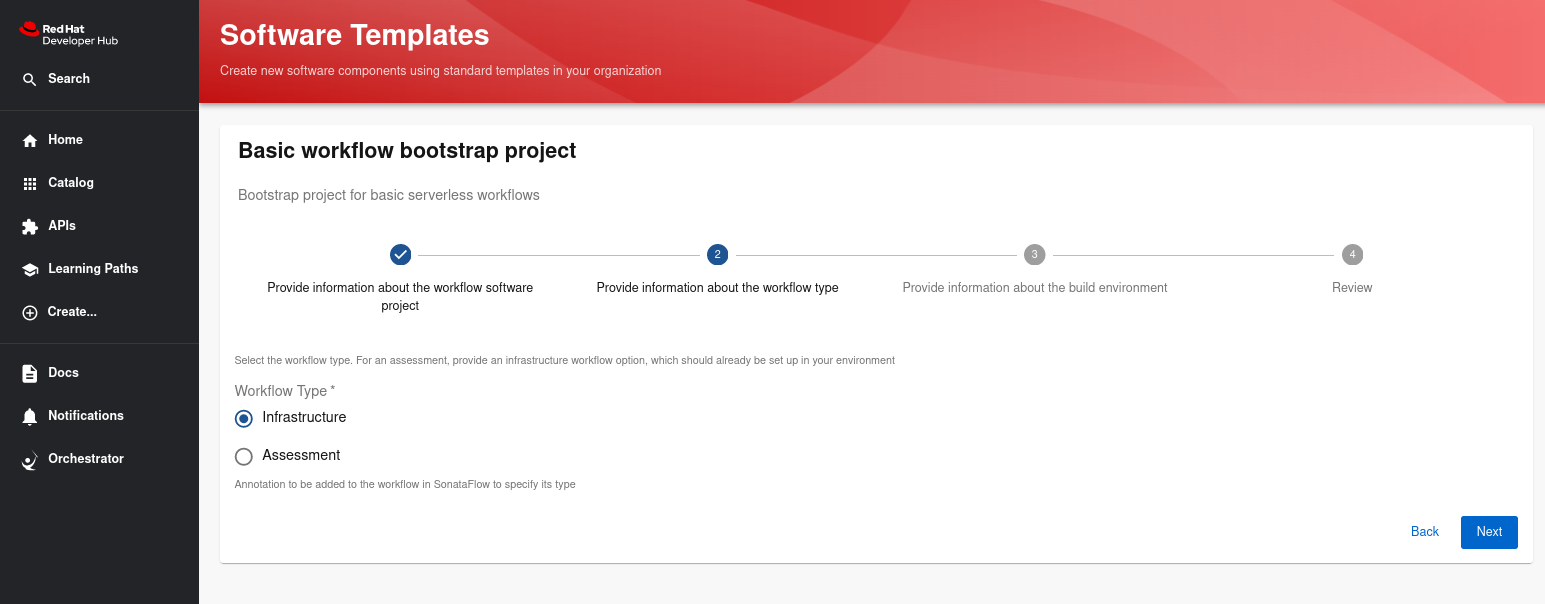
- Workflow Type - There are two supported types: infrastructure for operations returning output, and assessment for evaluation/assessment leading to potential infrastructure workflows.
🚨 Deprecation Notice: 🚨
In Orchestrator 1.7 release, Workflow Types will be retired. All workflows will act as infrastructure workflows, and no workflow will act as an assessment workflow.
The following document will be relevant up to Orchestrator version 1.6.
On the final screen, you’ll be prompted to input the CI/CD parameters and persistence-related parameters.
- Select a CI/CD method - Choosing None means no GitOps resources are created in target repositories, only the workflow source repository. Selecting Tekton with ArgoCD creates two repositories: one for the workflow and another for GitOps resources for deploying the built workflow on a cluster.
- Workflow Namespace - The namespace for deploying the workflow in the target cluster, currently supporting sonataflow-infra where Sonataflow infrastructure is deployed.
- GitOps Namespace - Namespace for GitOps secrets and ArgoCD application creation. The default orchestrator-gitops complies with the default installation steps of the Orchestrator deployment.
- Quay Organization Name - Organization name in Quay for the published workflow. The Tekton pipeline pushes the workflow to this organization.
- Quay Repository Name - Repository name in Quay for the published workflow, which must exist before deploying GitOps. The secret created in the GitOps Namespace needs permission to push to this repository.
- Enable Persistence - Check this option to enable persistence for the workflow. It ensures each workflow persists its instances in a configured database schema, with the schema name matching the workflow ID. Persistence is recommended for long-running workflows and to support the Abort operation.
- Database properties - Self-explanatory list of database properties.
After providing all parameters, click Review, ensure correctness, and then click Create. Successful creation leads to:
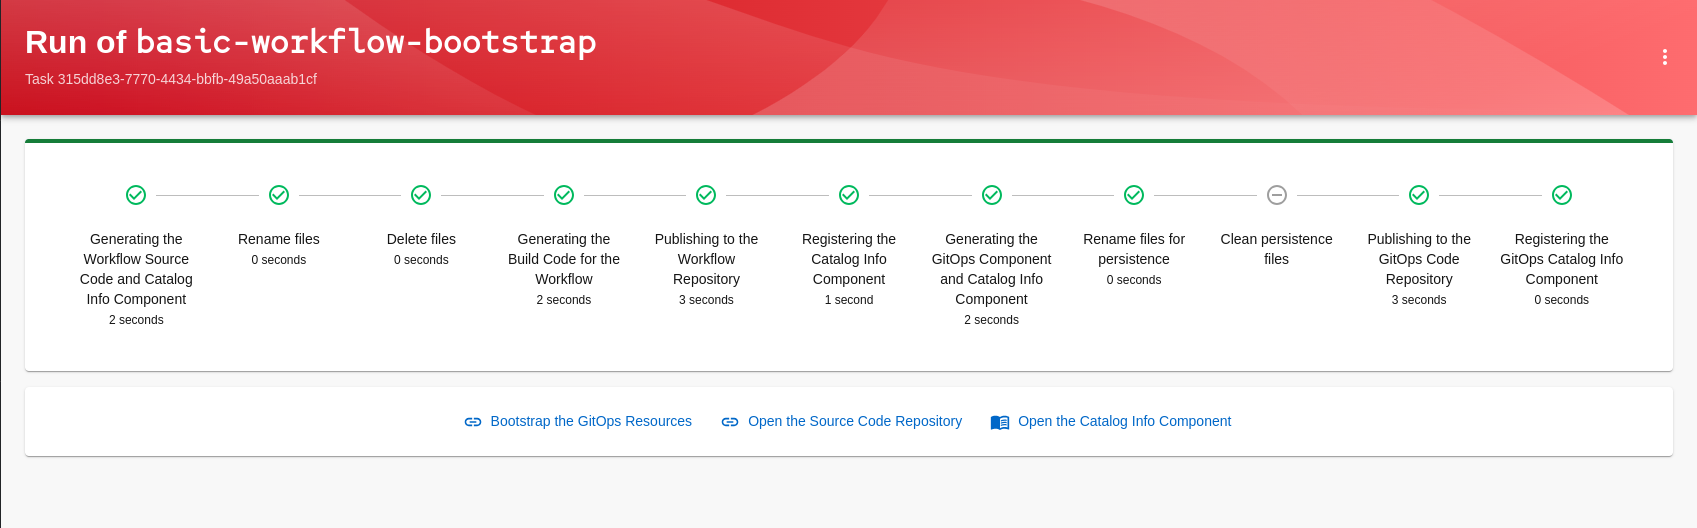
This includes links to three resources:
- Bootstrap the GitOps Resources - Directs to the workflow GitOps repository, enabling GitOps for ArgoCD deployment on the target cluster.
- Open the Source Code Repository - Opens the Git repository for workflow development.
- Open the Catalog Info Component - The RHDH Catalog Components view which should include the newly created components: the workflow source repository and the workflow GitOps repository.
Bootstrap the GitOps Resources
Navigate to the first link to enable GitOps automation on the cluster. Follow the steps provided, including setting up CI pipelines and viewing ArgoCD resources.
Exploring the Repositories
The source code repository is where the workflow development happens. Each commit triggers the CI workflow.
The GitOps resources repository contains deployment configurations for the workflow on the OCP cluster.
Viewing the Catalog Info Components
Both repositories are represented as components in RHDH:
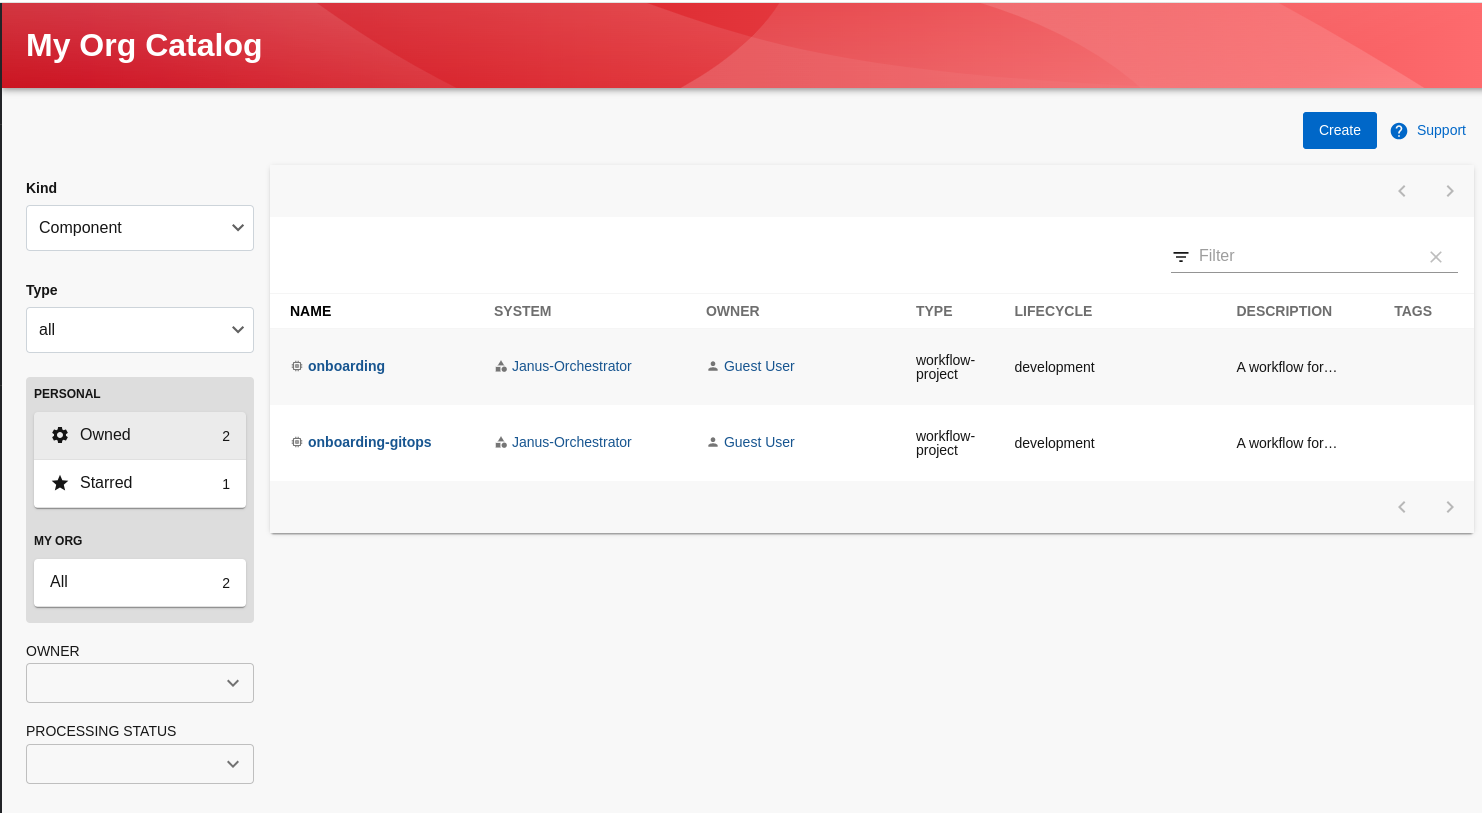
View the Source Code Repository Component
This component represents the Git repository where workflow development occurs. Navigating to the CI tab reveals the pipeline-run diagram:
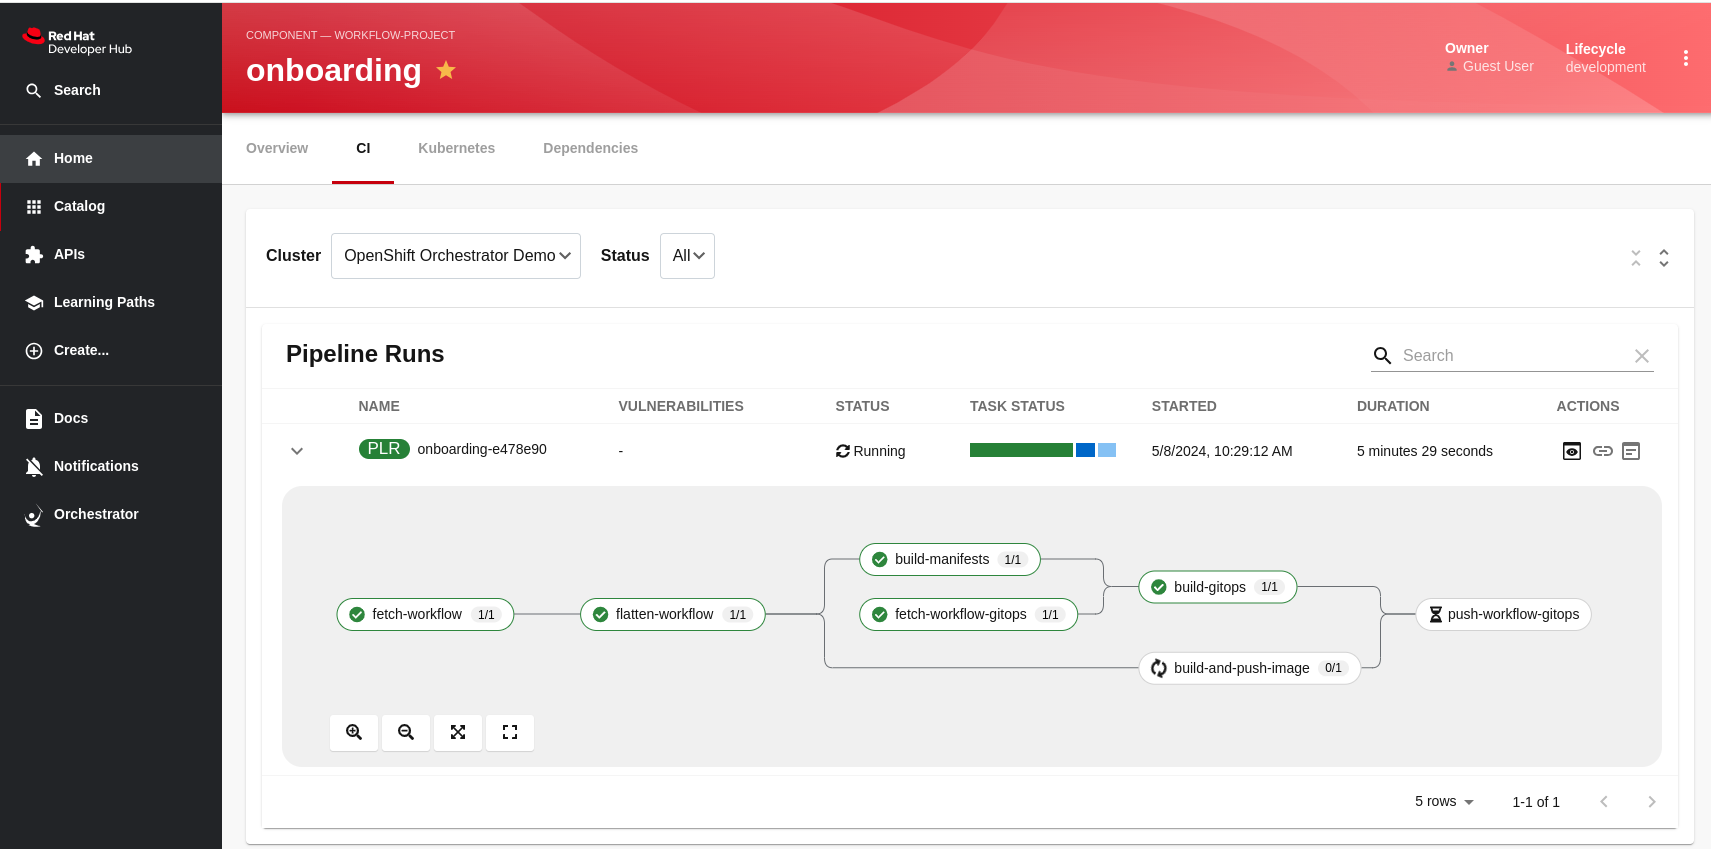
Once the pipeline-run is completed, the CD step starts, and the workflow is deployed on the cluster.
View the GitOps Resources Repository Component
This component represents the deployment of the workflow on the OCP cluster. Navigating to the CD tab shows the K8s resources representing the deployed workflow. When the items in this view are ready, the workflow should be ready to be executed from the Orchestrator plugin.
Running the workflow
After completing the CI/CD pipelines, navigate to the Orchestrator plugin, choose the workflow, and run it.
Conclusion
Streamlining workflow development and deployment empowers developers to focus on creating impactful workflows tailored to their needs.
What is Sonataflow Operator?
SonataFlow Operator
The SonataFlow Operator defines a set of Kubernetes Custom Resources to help users to deploy SonataFlow projects on Kubernetes and OpenShift.
Please visit our official documentation to know more.
Available modules for integrations
If you’re a developer, and you are interested in integrating your project or application with the SonataFlow Operator ecosystem, this repository provides a few Go Modules described below.
SonataFlow Operator Types (api)
Every custom resource managed by the operator is exported in the module api. You can use it to programmatically create any custom type managed by the operator. To use it, simply run:
go get github.com/kiegroup/kogito-serverless-workflow/api
Then you can create any type programmatically, for example:
workflow := &v1alpha08.SonataFlow{
ObjectMeta: metav1.ObjectMeta{Name: w.name, Namespace: w.namespace},
Spec:       v1alpha08.SonataFlowSpec{Flow: *myWorkflowDef>}
}
You can use the Kubernetes client-go library to manipulate these objects in the cluster.
You might need to register our schemes:
    s := scheme.Scheme
utilruntime.Must(v1alpha08.AddToScheme(s))
Container Builder (container-builder)
Please see the module’s README file.
Workflow Project Handler (workflowproj)
Please see the module’s README file.
Development and Contributions
Contributing is easy, just take a look at our contributors’ guide.
See origin of this content here.